|
|
 Hand Warmers |
 Mitred Corner |
 Crocheted Ribbing Seam Tutorial |
 Nappy Cake |
 Tiramisu Recipe |
 Bowl Cover |
 Blocking Howto |
 Rose Howto |
 Bowl Cover |
 Collar |
 Crochet Curved Edging |
|
Filet Mat |
|
Filet Mat |
 Estonian Lace |
 Counterpane |
 Quick Knit Poppy |
 Meggy Square |
 Slippers |
 Flat Slippers |
 Crochet Beret |
 Prime Rib Hat |
 Bicolour Hat |
 Bicolour Cosy |
 Tea Cosy |
 Tissue box cover |
|
Baby Jacket |
 Seamless Bootee |
 Mitres Tutorial |
 Crochet Butterfly |
 Crochet Pelerine |
 Swan Doilies |
 Crochet Brioche Hat |
 Crochet Brioche Tea Cosy |
 Puffy Rib Cosy |
 Crochet Coffee Plunger Cosy |
 Rosy Cosy |
 Roses Afghan |
 Hexagonal Motif |
 Crochet Rose |
 dc HowTo |
 Tutorials Tidy Ends Change Colours Back Ridge Starting Chain Mystery Stitch Knitting: Buttonholes Twice Knit Increase/Decrease |
 Crochet Square Tutorial |
 Tatting Bobbin Lengths Chart |
 Crochet Square |
|
Granny Rectangle |
 Crochet Bib |
  Soccasins & Mary Janes |
 Crochet Bootee |
 Crochet Bootee |
(Garter/Rib Slippers)
Average Woman's Size
by Megan Mills, email:megan@kiwi.gen.nz
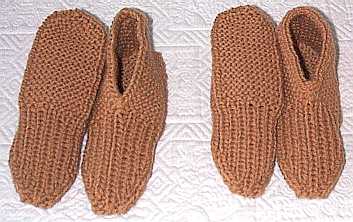
The pair on the left has a crocheted border, the pair on the right has an I-cord border.
Terms: |
|
| K | Knit |
| P | Purl |
| K2T | Knit 2 together. |
| SSK | Slip 1 knit-wise, Slip 1 purlwise, insert left-hand needle through both stitches from left to right and knit them together. |
| M1 | Make a loop over your left thumb and place on the right-hand needle (the thread leading out of the loop will pass in front of the loop, if you do it with the right thumb it will lead from behind). Do not 'match' these increases, they will look strange on the garter stitch when followed by the purl stitch in the pattern. When you knit the M1 on the return row knit into the front of the loop, the loop will be twisted and this is correct. |
| Rib | K1, P1 rib. |
| I-cord | On double pointed needles cast on 4 stitches. Knit four stitches. Do not turn. Slide stitches to other end of needle. Pull yarn across the back of stitches and knit across. Repeat this and you will get a knitted cord. |
| dc | Double crochet (US - single crochet). |
| Graft | A way of joining a seam so that it looks like the knitting. To do this I work a 'mock row' with contrasting yarn and then use this as a guide to follow with the garment yarn. Thread it onto a needle and join one stitch to the other (the same as you would seam them) but instead go in and out of the stitches the same way your contrasting yarn does. Maintain a tension the same as your knitting. Remove the waste yarn, tidy away your ends and admire! You will find this stitch (but not necessarily the contrasting-waste-yarn guide method - I can't remember where I first learned that) in several books, often it is called Kitchener Stitch. By the way, the contrasting-waste-yarn guide is very handy for grafting lace and fancy patterns. |
Supplies:
Double Knitting Wool (used two strands at once) - or any thick yarn that will give the required gauge. However, if you use a thick yarn make sure it can be split to work the I-cord or have a thinner yarn for the I-cord. The amount used varies, I usually get a pair out of two 50g balls of wool - it depends on how light the wool is for its thickness.Double pointed needles to give required gauge (I use 4.5mm for the slippers and 3.25mm for the I-cord border). For knitting around I have the stitches on three needles and knit with the fourth. Once I get to the toe decreases I have the stitches on four needles and knit with a fifth (not actually necessary, just less awkward).
Crochet hook (about 5mm) if you want to do a crocheted border.
Hat elastic
Contrasting waste yarn
Wool needle (for grafting or seaming and threading in elastic)
Method (both slippers are made alike):
Gauge: about 4 stitches to the inch (8 stitches to 5 cm) over garter stitch.Using contrasting waste yarn and the DOUBLE thickness of the slipper yarn cast on 22 stitches. Use an invisible method if you want to graft the back-of-heel seam later. If you want to simply seam it just cast on the 22 stitches. For both methods leave a tail long enough to do the seam.
Garter Stitch Section: Worked back on forth on two needles (I use a pair of the double pointed needles but you can use a pair of knitting pins for this bit if you like). Slip the first stitch purl-wise to make a chain edge if you want to add an I-cord (or crocheted) border. If not slip it knit-wise and you will get a nice garter stitch edge.
Row 1: K 11, M1, K11 Row 2: K10, P1, K1, P1, K10 Row 3: K11, M1, K1, M1, K11 Row 4: K10, P1, K3, P1, K10 Row 5: K11, M1, K1, M1, K1, M1, K1, M1, K11 Row 6: K10, P1, K7, P1, K10 Row 7: K11, M1, K2, M1, K3, M1, K2, M1, K11 (you now have 33 stitches) Continue in garter stitch (maintaining the purl stitch at the 11th and 23rd stitches on alternate rows to keep the lines of stocking stitch going up each side of the sole) until you have a total of 20 ridges below your needle on the right side and the right side is facing you.
Rib Section: Change to rib. At the end of this row make it into a round and join it by knitting the last stitch of this row together with the first by using SSK - treat this stitch as the first stitch of the round. You now have 32 stitches. Rib for 11 rounds.
Shape Toe: (arrange the stitches on the needles as you go so they are comfortable for you - I arrange mine so that the needles change between the K2T and the SSK).
Row 1: Rib 7, K2T, Rib 15, SSK, Rib 6 Rows 2, 4, 6: Rib, keeping stitches in pattern to allow for the decreased stitches. Row 3: Rib 6, K2T, SSK, Rib 11, K2T, SSK, Rib 5 Row 5: Rib 5, K2T, SSK, Rib 9, K2T, SSK, Rib 4 Row 7: Rib 4, K2T, SSK, Rib 7, K2T, SSK, Rib 3 Row 8: Rib 3, K2T, SSK, Rib 5, K2T, SSK, Rib 2 Row 9: Rib 2, K2T, SSK, Rib 3, K2T, SSK, Rib 1 Assembling: Graft the back of heel seam (you effectively fold your cast-on edge in half). I pick up the stitches with a smaller needle, take out the contrasting waste yarn and use it to work a mock row with the larger needle. I put half the stitches on another needle, fold the knitting so the two needles are parallel and use the contrasting yarn as my guide for grafting. Graft the 10 toe stitches (work a mock round with the contrasting yarn), the upper's 5 to the sole's 5 (I 'fudge' this bit because the yarn doesn't end up at the most convenient spot for grafting - just carry it the short distance - I promise it'll be FINE). Tidy away all ends. If you don't like grafting just do a tidy seam.
I-cord Border: You will be picking up the chain stitches around the foot opening in this order: From centre back of heel to toe down the left side. From centre back of heel to toe down the right side. Graft together at toe.
With contrasting waste yarn cast on I-cord as directed above and work two rows with the contrasting yarn. Now measure off about 3.5 metres of the slipper yarn (single thickness only) and work one row with the yarn attached to the ball - leave the long length of yarn waiting, do not break it off. You are going to use it later to work I-cord down the other side of the foot opening. At the end of this row insert the end of the needle through the chain stitch of the slipper's foot opening (both loops of the chain are on your needle - treat them as if they are one stitch) so they are now positioned as a 5th stitch on the needle.
Row 1: Knit 3 stitches of the I-cord and K2T the last I-cord stitch with the picked-up chain stitch. Row 2: I-cord one row, put the next chain stitch on the end of the needle. Repeat these two rows until you get to the centre front. Hold the stitches in waiting to be grafted.
Use the contrasting yarn at the start of the I-cord to figure out where to pick up the four stitches of the I-cord slipper yarn. Using the long length of yarn you measured off at the start (sometimes I need to pull this length through one of the stitches to free it properly for knitting - because of the way I do my 'invisible' cast-on) work I-cord down the other side of the foot opening as follows:
Row 1: Pick up the chain stitch from the slipper's foot opening and put it on the needle as the 1st stitch (as opposed to the 5th stitch when you were doing the other side). Now SSK and knit the remaining three I-cord stitches. Row 2: I-cord one row. NOTE: As you I-cord down both sides of the foot opening you are always joining from the outside of the slipper
Work I-cord border as above until you get to the centre front. Graft the two ends of I-cord together (or seam them, or whatever takes your fancy and looks tidy!). Remember to remove waste yarn once it has served its purpose. Why don't I just work I-cord all the way around in one direction? Because no matter what I've tried one side ends up looking different to the other and it annoys me. If it doesn't annoy you just do it that way...
Now run hat elastic right through the I-cord border and tie off for a snug fit. Tidy away loose ends and enjoy (I put a little bullion rose made out of wool at the centre front of the I-cord border when I make these for a woman - they are ideal for a bit of embellishment with wool embroidery).
Crocheted Border: Join in yarn (double thickness) at back of heel. Work one dc into each chain stitch, when you get to the two centre front chains work one dc but don't pull the thread through for the second time, work one dc into the next chain and this time pull the thread through all three loops on the hook (a standard decrease). Continue working one dc into each chain until you reach the back of heel. Neatly fasten off and tidy away ends. Run hat elastic through the base of the dc's and tie off for a snug fit.
If you chose not to do a border and just had the garter-stitch edge then run the hat elastic around the opening on the inside, set back one stitch.
I have found that it is easy to vary the size of these slippers. You can change the gauge (worked on smaller needles with a single strand it makes a small child's slipper) or you can change the number of stitches and rows quite easily. After you have knitted them once you will see what I mean.
Last modified: 3 November 2002