|
|
 Hand Warmers |
 Mitred Corner |
 Crocheted Ribbing Seam Tutorial |
 Nappy Cake |
 Tiramisu Recipe |
 Bowl Cover |
 Blocking Howto |
 Rose Howto |
 Bowl Cover |
 Collar |
 Crochet Curved Edging |
|
Filet Mat |
|
Filet Mat |
 Estonian Lace |
 Counterpane |
 Quick Knit Poppy |
 Meggy Square |
 Slippers |
 Flat Slippers |
 Crochet Beret |
 Prime Rib Hat |
 Bicolour Hat |
 Bicolour Cosy |
 Tea Cosy |
 Tissue box cover |
|
Baby Jacket |
 Seamless Bootee |
 Mitres Tutorial |
 Crochet Butterfly |
 Crochet Pelerine |
 Swan Doilies |
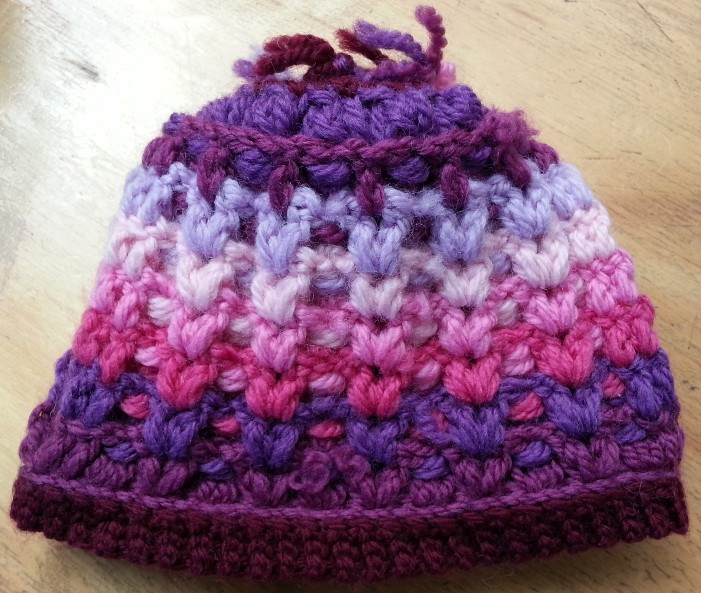
 Crochet Brioche Hat |
 Crochet Brioche Tea Cosy |
 Puffy Rib Cosy |
 Crochet Coffee Plunger Cosy |
 Rosy Cosy |
 Roses Afghan |
 Hexagonal Motif |
 Crochet Rose |
 dc HowTo |
 Tutorials Tidy Ends Change Colours Back Ridge Starting Chain Mystery Stitch Knitting: Buttonholes Twice Knit Increase/Decrease |
 Crochet Square Tutorial |
 Tatting Bobbin Lengths Chart |
 Crochet Square |
|
Granny Rectangle |
 Crochet Bib |
  Soccasins & Mary Janes |
 Crochet Bootee |
 Crochet Bootee |
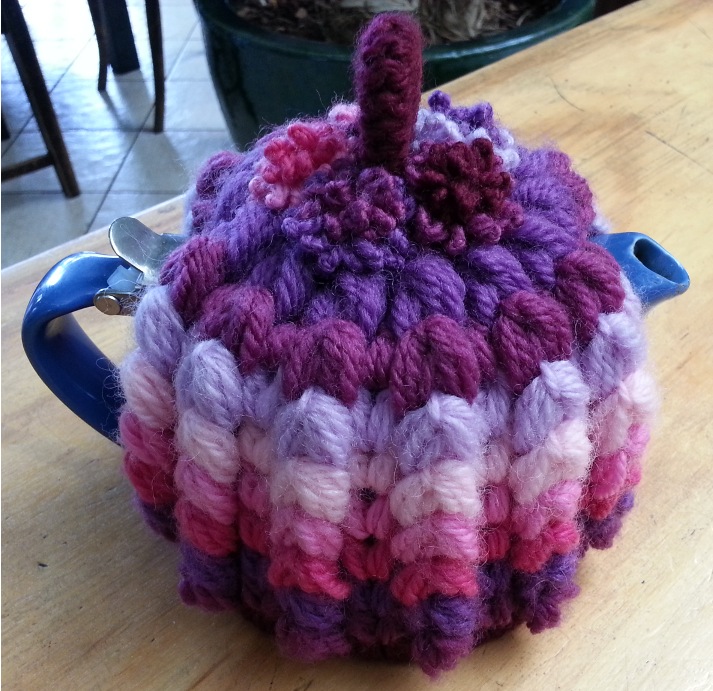
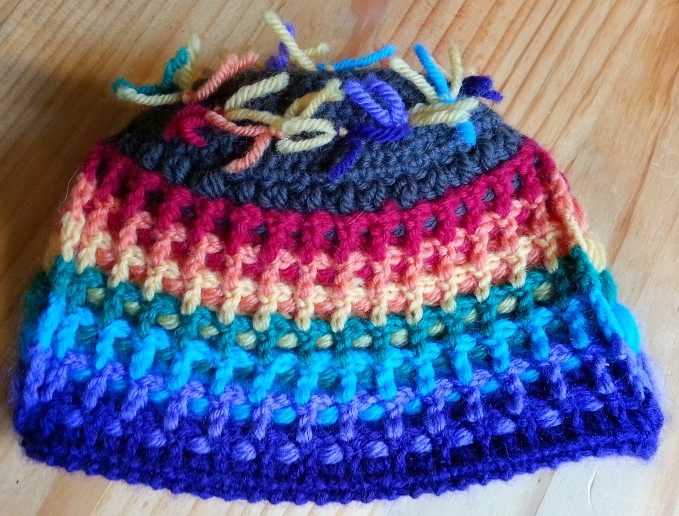
1930s Inspired Crochet Tea CosyA free crochet pattern by Megan Mills © 2015megan@kiwi.gen.nz
Hello fellow crafty people. :) This was inspired by some vintage tea cosies that were popular in the 1930s that had a flower basket on top and ribs of “puffy stitches”. Here I have used a hanging loop instead – any basket small enough to fit on top of this little cosy would be too small. For a larger cosy you can make a basket, I tell you how at the end of the pattern under Variations.
I first saw a cosy like this at the Garnet Station cafe - one of my favourite places for an oven-fresh cinnamon brioche early Saturday mornings. They have a beautiful old cosy with a basket on top, puffy ribs and slightly-scraggly-but-used-to-be-lovely flowers on top. Apart from the gorgeous soft "watercolours" what really caught my eye was that the original maker had made a long strip of garter stitch, just a few stitches wide, and joined it into a ring for the bottom band. From there she worked the rest of the cosy in crochet. I'd never seen that before and you can try it too, if you like. You will need 50 garter stitch ridges in your base strip if you'd like to try this method. Treat each ridge as you would each crocheted rib in the instructions below. I made a cosy for the cafe using that method, and bright rainbow colours. I liked it a lot and think this cosy will work well with any colours at all and will work just as well with a variety of decorations on top. While flowers are traditional this could also be a nice way, for example, to show off some favourite buttons if you have a vintage button collection... For the original cafe cosy, however, the worker just used ordinary trebles between the puffy ribs. For my taste the cosy needed to be thicker. I also wanted a cosy that was worked just in crochet - my thinking being that there are more people who crochet than crochet and knit. So I developed this pattern that is inspired by the vintage "flower basket" tea cosies but isn't quite the same.
The directions for this pattern are quite long but that is deceiving. It is very quick to make and a lot of the directions are to teach you about special methods I use or to explain how you can adapt this pattern to make the design in a variety of sizes to suit your teapot - or that of some lucky recipient. The ultimate gift for a tea-loving friend would surely be the teapot to go with it - and perhaps afternoon tea at your place?
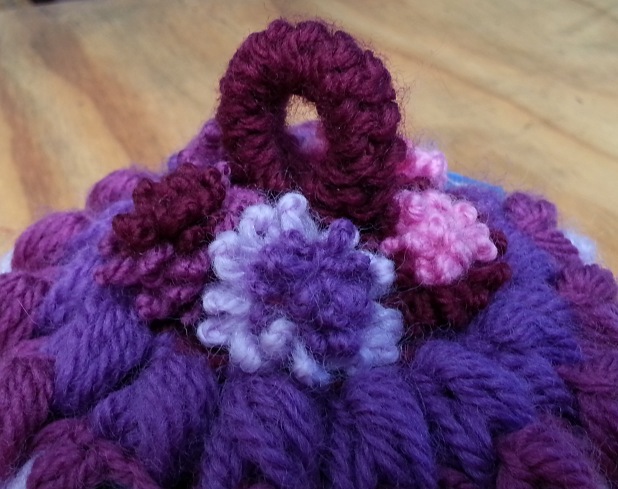
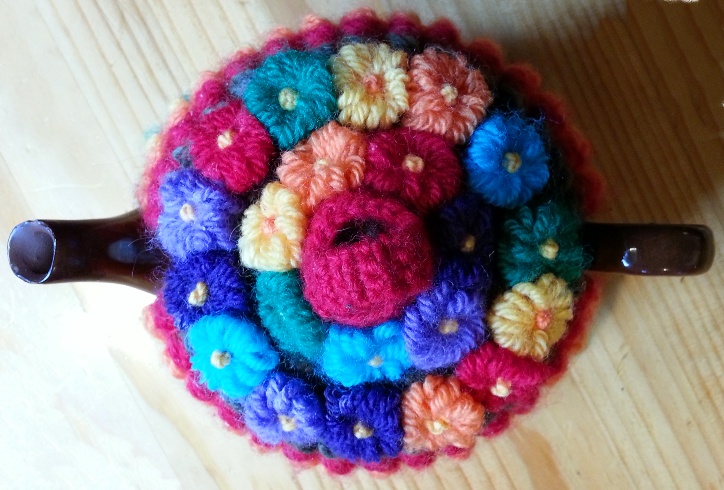
Please put the kettle on and enjoy! Megan Experience Intermediate - please carefully read all the instructions before starting. Size The pattern as written is for a 2-cup teapot and measures 14.5cm across the bottom ribbing and 14cm tall (excluding flowers and hanging loop on top). It has 6 “puffy ribs” on each side. Five rows in the puffy rib pattern is just over 6cm tall. The size can be varied by adding extra puffy ribs on each half (each puffy rib adds 2.3cm in width) and doing more rows before decreasing for the top and/or doing rounds to close the spout and handle holes. You can also alter the top by doing less decreasing rows or rounds and working a larger area on top to be filled with more flowers. For each extra pair of puffy ribs (one for each side of the pot) you will need 8 more stitches. To allow for this you will need to do 16 extra rows of crochet ribbing for the base. So if, for example, you wanted a cosy with 8 puffy ribs on each side then you would need to start with an extra 32 rows of crochet ribbing on the base and would have 66 dc on your first round rather than 50. I have also successfully made a larger cosy using exactly the same instructions by using a 4mm hook. All the puff twists and puff trebles were taller and a bit “chubbier” and I used a few more flowers to decorate the top. Each row or round that uses puffy twists is done in a separate colour, but both sides of the cosy have a matching colour sequence. Notes Always leave tails at least 4 inches long to be worked in and over as the cosy is made. Or you can weave them in at the end if you prefer. They're good for the cosy. They thicken it, strengthen it, make it last longer and make it, well, cosier! When starting new rows or rounds of colour I do not join the yarn and chain up to “stand for the first stitch”. I use a real stitch to stand for the first stitch. I start with a tail and a single chain and then work the full normal stitch where I want it. The instructions just tell you the full stitch to use. Later, when I want to weave in the tails, I undo the single beginning ch – it was just there to get me started. I use a wool needle to run the beginning and ending tails along the tops of the sts towards the middle and like it if they pass each other for a puff or two. I then work over them on the following row or round. This hides and secures them very well. I trim the final bits of ends to 1cm if I haven't been able to hide them completely as I work over them. Read the abbreviations and special instructions carefully. The puff treble was developed by me especially to make this cosy thicker than the traditional patterns that used plain trebles (US double crochets) or plain V‑stitches between the puffy ribs. Materials My completed cosy weighs 53 grams. As shown I used a small amount of each of 7 different colours of real wool double knitting yarn. Double knitting yarn commonly has a recommended gauge for knitting of 22 sts and 30 rows to 10cm on 4mm needles. A 50g ball is usually around 100m long. Or you can just use up all your odds and ends, this is a good “scrap cosy”. Try to make sure your yarns are all the same grist and all made of the same fibre so the cosy will wash well. 3 mm and 3.5mm crochet hooks (or hooks to obtain the fabric you like) A blunt-tipped wool needle. Abbreviations ch = chain ss = slip stitch dc = double crochet (US single crochet) dc dec = double crochet decrease (US single crochet decrease): work 1 dc but do not pull yarn through last two loops, work 1 dc in the next stitch and finish both together by pulling through all 3 loops on hook. htr = half treble (US half double crochet) sp = space st = stitches yoh = yarn over hook Special instructions ptr = puff treble (US puff double crochet): Yoh, insert hook through stitch indicated, yoh and draw a loop through, yoh, insert through same st again, yoh and draw a loop through, yoh and draw through all but last loop on hook, yoh, draw through last two loops. ptw = puff twist: As you work the successive loop pull-ups described below pivot the plane of your work towards you with your left hand. This gives you clear access and makes it much easier to pull up even loops when doing a ptw behind another ptw. *Yoh, insert hook into stitch indicated or behind the ptw of the previous row or round (by inserting the hook from the front on the right-side of the earlier ptw and poking it out again towards the front of the work on the left side of the earlier ptw), yoh, draw loop up to full height of a ptr, use your right ring finger to stabilise the loops on the hook. Repeat from * 3 more times, yoh and draw through all loops on hook, do one small, very tight ch to lock off the top of the ptw. As you make a ptw it helps to keep an “upward tension” on all the loops on the hook. V-st = V-stitch of (ptr, 1ch, ptr) all in the same space. ST = special turn. A special turn avoids a holey selvedge: Insert your hook from far side to near side through both top loops of the last st worked, yarn over hook and draw through the loop. Now turn. Yarn over hook and draw through both loops on hook. This is counted as the first dc of the next row. A “magic ring” (sometimes called a magic circle or magic loop) is done by making a double loop of yarn around your index finger with the tail going to your right and the working end going over your left finger. Holding the loops in this position remove them from your finger and pinch them between your thumb and middle finger on your left hand. Insert your crochet hook, front to back, into the ring, yoh and draw through a small loop, yoh and draw through the loop on the hook. You are now ready to crochet into the magic ring. (If you are going to do taller sts you can do some ch at this point, in this pattern we use dc so no extra ch are needed.) After working your first round of sts into the magic ring tighten it by pulling first one strand in the centre and then the tail. It matters which loop you pull first. To find the right loop to pull first, pull slightly on the tail and observe the two loops you made around your finger – the first loop that begins to tighten in the centre as you pull on the tail is the loop you pull on first. When it has taken up all the slack in the other loop, pull the tail to finish off. You can change the way you use the following rows and rounds to customise the size of your cosy. The pattern instructions tell you what I used, how many of each and in which order. First puffy twist row: 2 ptr, *ptw in next st, skip next st, V-st in next st skip next st. Repeat from * 5 more times, ptw in next st, ptr in each of next two sts. Cut off tail and pull thread through. Non-decreasing puffy twist row: 2 ptr, *ptw behind ptw on previous row, V-st in centre V-st of previous row. Repeat from * 5 more times, ptw behind ptw on previous row, ptr in each of next two sts. Cut off tail and pull thread through. Decreasing puffy twist joining round: [2 ptr, *ptw behind ptw on previous row, ptr in centre of V-st of previous row. Repeat from * 5 more times, ptw behind ptw on previous row, ptr in each of next two sts]. Without breaking thread continue the work as a round and repeat between [ ]. Cut off tail and pull thread through. Use tail to complete the join for the round. Further decreasing puffy twist round: [Ptw at spout/handle join by working a ptw through both top loops of the two centre ptrs, *ptw behind ptw on previous row. Repeat from *6 times]. Repeat between [ ]. Cut off tail and pull thread through. Use tail to complete the join for the round. Decreasing puffy twist row: 2 ptr, *ptw behind ptw on previous row, ptr in centre of V-st of previous row. Repeat from * 5 more times, ptw behind ptw on previous row, ptr in each of next two sts. Cut off tail and pull thread through. Further decreasing puffy twist row: 2 ptr, *ptw behind ptw on previous row. Repeat from * 5 more times, ptw behind ptw on previous row, ptr in each of next two sts. Cut off tail and pull thread through. Non-decreasing puffy twist joining round: [2 ptr, *ptw behind ptw on previous row, V-st in centre of v-st of previous row. Repeat from * 5 more times, ptw behind ptw on previous row, ptr in each of next two sts]. Without breaking thread continue the work as a round and repeat between [ ]. Cut off tail and pull thread through. Use tail to complete the join for the round. The Base is a long strip of crochet ribbing joined into a circle. This is elastic and will stretch to go over the pot and then sit snugly again. It is important that you keep your slip stitches an even size. It is very easy to do them progressively tighter and tighter. Aim to give each ss the whole amount of thread required to go around the hook. I used double knitting yarn and a 3mm hook. You can use whatever hook gives you firm, elastic ribbing – not sloppy and not stiff like cardboard either. You should be able to stretch it out and have it “spring” back with definite elasticity. (This makes good cuffs for the bottom of sweater sleeves too and is the same method I used for the socks in the Soccasins pattern) Using a 3mm hook start with 6 ch worked slightly loosely. TURN. If you want a wider base use more starting chain. This is your choice but aim to keep it below the handle or spout – whichever is lower on your pot. Row 1: 1ss into the top loop of the 2nd ch from the hook, ss into the top loops of the next 3 chain, 1ch, TURN. (Ignore the last chain – you'll unpick it later and use that tail for joining a tiny seam.) Row 2: Ss through the back loops of each ss, 1ch, TURN. Repeat row 2 until you have done 100 rows Join into a circle by unpicking the extra chain you made at the start and using the tail to make a neat seam. You should have 50 vertical “ribs” in your band – each one formed by working two rows of the ss ribbing pattern. Sides As you work this first row take the opportunity to work over the tail ends from your beginning band. Lay the tails in opposite directions around the band rather than rather than work over both tails together. Round 1: Using another colour and a 3.5mm hook, do 1dc into the top of each elastic rib on the base. Pick up two threads (the top of each elastic rib was made with your turning chains at the end of each row). After you work the first round you should have 50dc in total – if not it is quite okay to fudge 1 or 2 extra stitches here or there. Cut thread, pull through tail and use to neatly join the round. You will now change to working in rows. Every row is worked in the same direction – you do not turn at the end of each row. The second side is made to match the first until you decide to join back into the round to close the handle and spout holes and/or start decreasing towards the top of your cosy. Each row is worked in a different colour. Now do one First puffy twist row on each side. Follow it with 5 rows on each side of the Non-decreasing puffy twist row, using a new colour for each row and making both sides match. Top Next do a Decreasing puffy twist joining round. Next do a Further decreasing puffy twist round. Closing the top (all worked in one colour) Round 1: 1 dc into every st. You should have 28 sts at the end of the round. Cut thread, pull through tail and use to neatly join the round. Round 2: Starting somewhere else on the round, *1 dc into each of next 2 sts, dc dec. Repeat from * to the end of the round. Cut thread, pull through tail and use to neatly join the round. You now have 21 sts. Round 3: Starting somewhere else on the round, *1 dc into next, dc dec. Repeat from * to the end of the round. Cut thread, pull through tail and use to neatly join the round. You now have 14 sts. Round 4: Starting somewhere else on the round, *dc dec. Repeat from * to the end of the round. Cut thread, pull through tail and use to neatly join the round. You now have 7 sts. Use the tail to draw the 7 stitches closed. To vary the top for larger sizes you can start by putting a plain round of dc in between the decreasing rounds and adjust the number of decreases on each round to suit. The more decreases you do, the flatter the top of your cosy. If you want a pointier top, use less decreases. As a starting point aim to do about 7 or 8 decreases on each decrease round. Hanging Loop Using a “magic ring” beginning make 4dc into the ring. Working into the back loops only ss into every st. Continue in a spiral working ss into the back loops only of the previous sts and, after a few rounds, ensure that you have pulled your starting tail out of the tube you are making. Continue making the tube until it is long enough for the ring you want. Cut tail, pull through and run through the top of the final four stitches a couple of times and pull together firmly to close the tube. Run each tail right through the the middle of the tube starting on the opposite end and re-emerging where that tail started. This forms the ring, firms it (so it doesn't stretch longer and longer) and controls the size of the ring. Tie the tails together in a firm square knot and use them to firmly stitch the ring on top of the cosy. Hide the final tails left over by weaving them into the dc fabric at the top of the cosy on the inside. Flowers Make a variety of flowers using all your colours to fill the top area of your cosy and tie them on using their tails. I used five chrysanthemums on this cosy. You can use any flowers you like. I make the chrysanthemums by knotting wool with simple overhand knots at intervals of about 1.8cm for the outer petals and 1.2cm for the contrasting colour in the middle. In both cases allow for 15cm tails at each end. For the outer colour I use more 37 knots and for the contrasting centres I use 29 knots. You may need to experiment to find the spacing of knots and number of knots to create the fullness you like in your flowers. For the out petals use one tail and a wool needle to pick up the first and every alternate knot and draw them together until you have 9 petals drawn into a ring. Run the thread through them again to firm up the ring. Using the tail at the other end repeat and arrange the two rings of 9 petals that they sit on top of each other and form a “ruff”. The same method is used for the contrasting centre but each ring has 7 petals. I pulled this together firmly so that it made a little mound of petals – which was further enhanced when joined into the middle of the whole flower. Stitch the contrasting centre to the middle of the outer petals. Arrange all the petals by pulling on the knots in the centre of the petals and taking extras stitches through the middle where necessary to secure them. I tied my flowers on individually and as evenly spaced as I could. On the inside I do a very firm square knot with the tails and then half a knot again. I trim the tails to one inch long. In some vintage cosies they also tied the flowers into little bunches and then attached the bunches to the cosy. Both look good – experiment a little to see what works best on your cosy. If you prefer you can fill the area up with wool embroidery and I've seen some cosies that also embroidered small green leaves in between the flowers. For the "loopy" flowers on top of the rainbow cosy I always leave about 4 inch tails at each end of both flower and centre wools. Wrap the "flower" wool around a ballpoint pen about 16 to 20 times depending on the fullness you want for your flowers (more or less is fine). Using another piece of yellow wool threaded on to a blunt-tipped wool needle pass it right through the middle of the “tube of wound wool” on the pen and through the middle again like laying a track inside a tunnel of loops. Then hold it all firmly (but not too tightly) between your fingers and thumb and slide it all off the pen. Pull the yellow centre up tight and knot it to form the rosette of loops. For the yellow centres take the tails of yellow wool through the middle to the side you like best as the front of the flower, tie a double or triple bulky knot in the middle and pass the ends back through the middle of the flower - making sure it was caught by the other yarns holding together the middle of the flower so the yellow knotted centre cannot pull through. Thread the “flower” wool onto the blunt-tipped wool needle and tidy them away to the middle of the flower. Tie them together with the yellow tails so the flower can’t unravel. Use all the ends to tie the flowers to the cosy. Variations
Fabric variations If you prefer not to have puff stitch Vs between the puff twists you can use three puff trebles instead or, as I did in the rainbow cosy, an ordinary treble, another ptw and an ordinary treble. This made the puffy twists twice as dense. Basket variation (A basket accommodates a knob on a teapot lid quite nicely.) To make a basket on top decrease the dc section on top of the cosy down until you have 20 sts remaining. You can do each round now in a new colour if you want a multi-coloured basket – or do your basket in one colour. Tails are worked over as you go and also run through each round a couple of extra times with a wool needle to strengthen and stiffen the basket. Basket Round 1: Working into the front loops only, 1 htr in every st. Cut tail, draw through and use the tail to neatly join the round. Round 2: Working through both top loops, 1 htr in every st. Cut tail, draw through and use the tail to neatly join the round. Larger baskets can be made on any even number of stitches and can be made taller by repeating Round 2. You will need to adjust the number of stitches left free on each side of the handle when you join it. Handle Decide which way you want your handle to go on your basket to determine where to start it. Row 1: Ch 1, dc in same st, dc in next 2 sts, ST. Row 2: Dc in next 2 sts, ST. Repeat the last row until your handle is long enough – I do 13 rows in total. Cut tail and draw it through. Use the tail to securely fasten the handle to the opposite middle 3 sts (there will be 7 sts of the basket round left free on each side of the handles). To make a firm and neat join I whip-stitch just one side of the top loops of the handle dcs and basket dcs together, and then the matching loops on the other side of those sts. I make a little backstitch or two on the inside and run this tail through the basket sts to further strengthen and stiffen the basket. Do the same with the beginning tail.
© Megan Mills, 2nd January 2015 |