|
|
 Hand Warmers |
 Mitred Corner |
 Crocheted Ribbing Seam Tutorial |
 Nappy Cake |
 Tiramisu Recipe |
 Bowl Cover |
 Blocking Howto |
 Rose Howto |
 Bowl Cover |
 Collar |
 Crochet Curved Edging |
|
Filet Mat |
|
Filet Mat |
 Estonian Lace |
 Counterpane |
 Quick Knit Poppy |
 Meggy Square |
 Slippers |
 Flat Slippers |
 Crochet Beret |
 Prime Rib Hat |
 Bicolour Hat |
 Bicolour Cosy |
 Tea Cosy |
 Tissue box cover |
|
Baby Jacket |
 Seamless Bootee |
 Mitres Tutorial |
 Crochet Butterfly |
 Crochet Pelerine |
 Swan Doilies |
 Crochet Brioche Hat |
 Crochet Brioche Tea Cosy |
 Puffy Rib Cosy |
 Crochet Coffee Plunger Cosy |
 Rosy Cosy |
 Roses Afghan |
 Hexagonal Motif |
 Crochet Rose |
 dc HowTo |
 Tutorials Tidy Ends Change Colours Back Ridge Starting Chain Mystery Stitch Knitting: Buttonholes Twice Knit Increase/Decrease |
 Crochet Square Tutorial |
 Tatting Bobbin Lengths Chart |
 Crochet Square |
|
Granny Rectangle |
 Crochet Bib |
  Soccasins & Mary Janes |
 Crochet Bootee |
 Crochet Bootee |
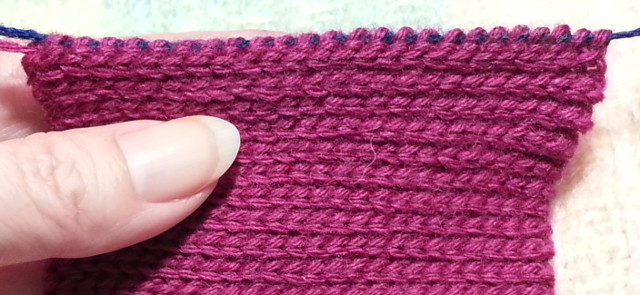
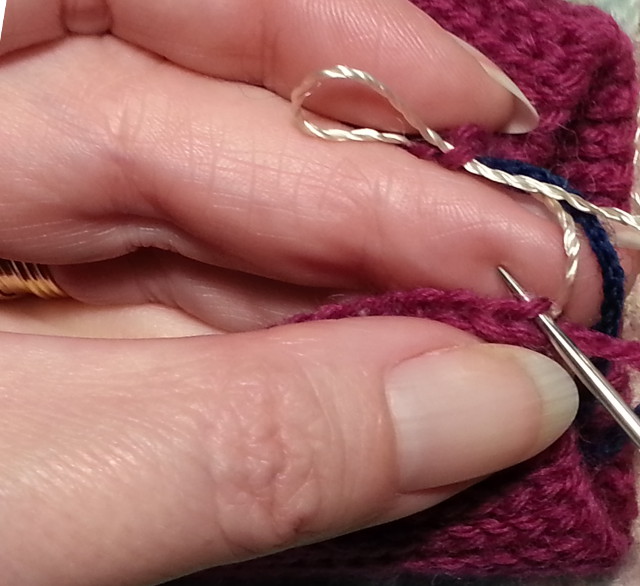
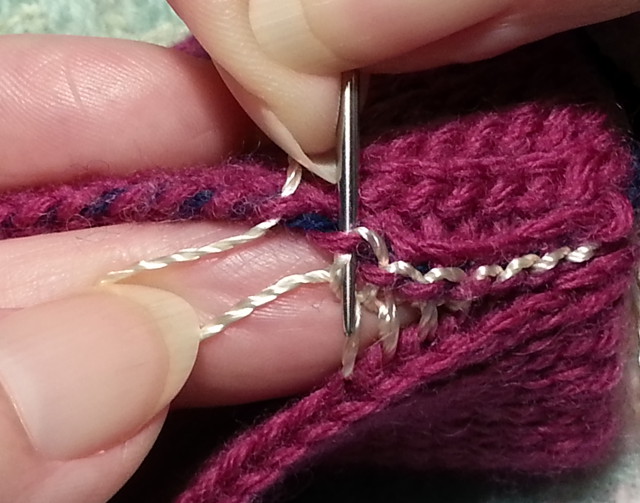
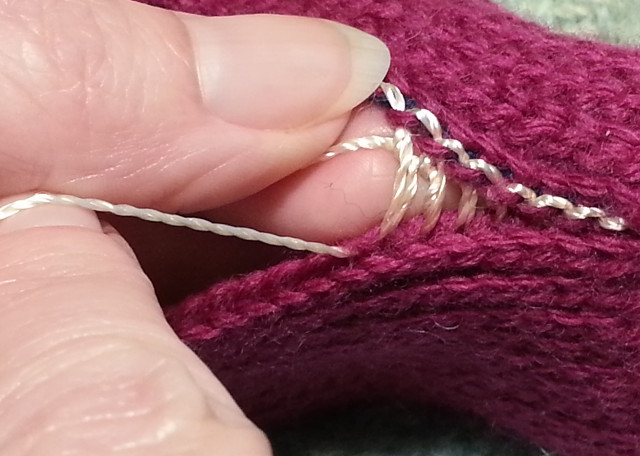
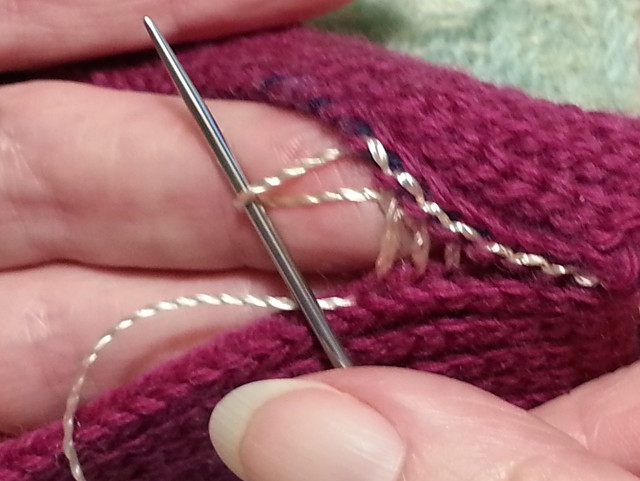
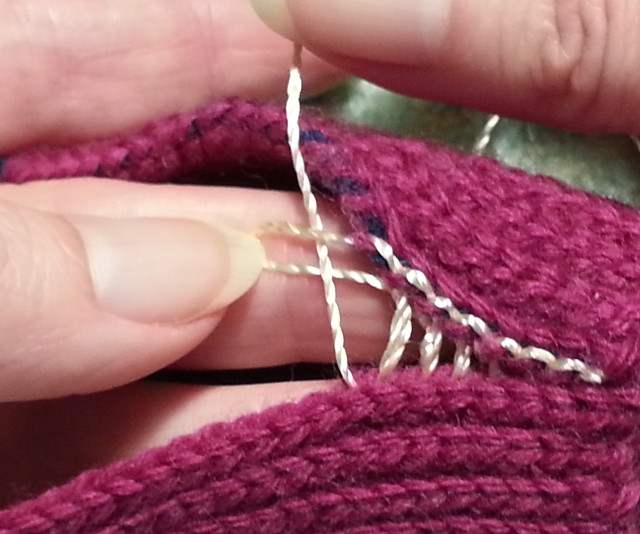
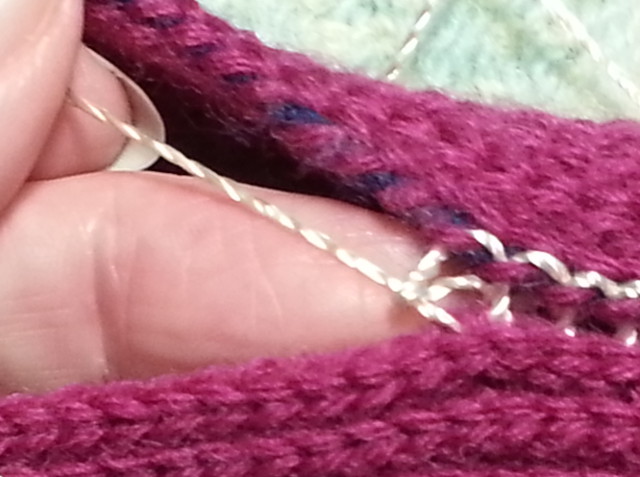
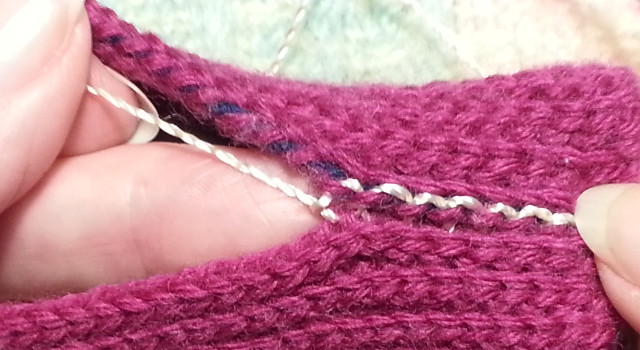
Crocheted Ribbing Seam TutorialA beautiful, invisible, fully reversible seam for the incredibly elastic crochet slip stitch "ribbing" that looks like knitting!
A free crochet tutorial by Megan Mills When I made the Soccasins pattern I used a slip-stitch crocheted ribbing for the sock legs because it looks like knitting and is incredibly elastic - much more elastic than any knitted ribbing I've ever found.
Click the
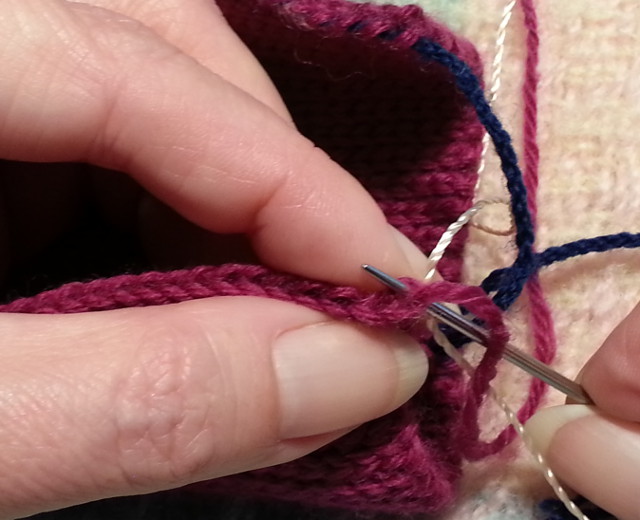
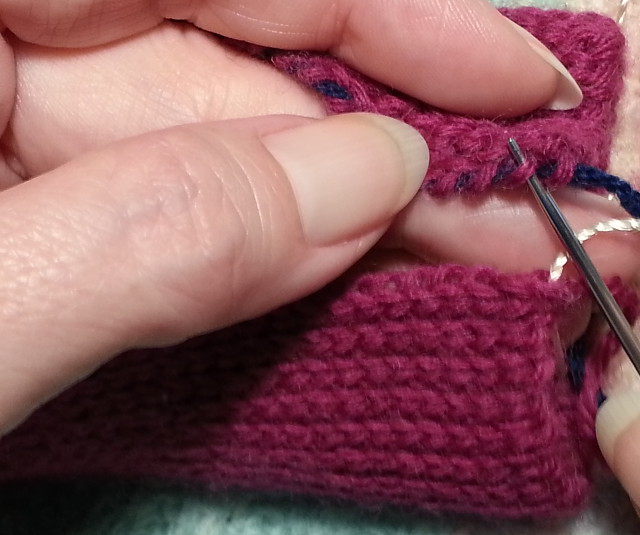
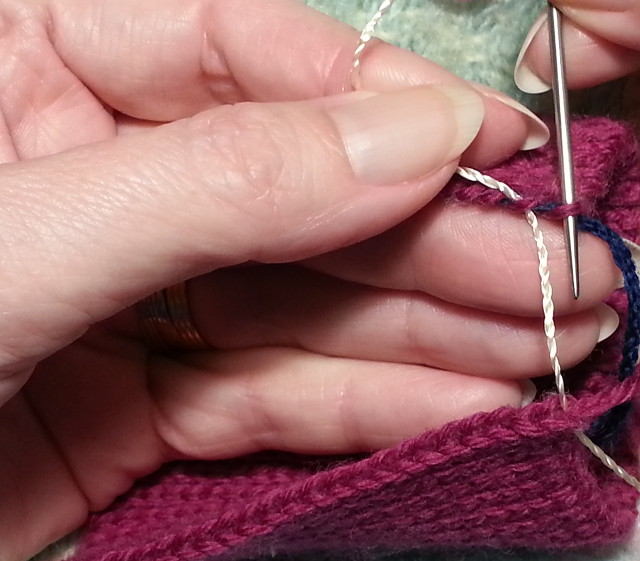
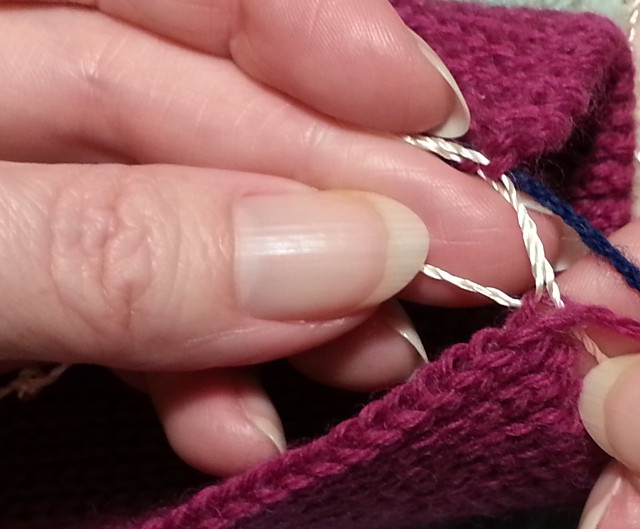
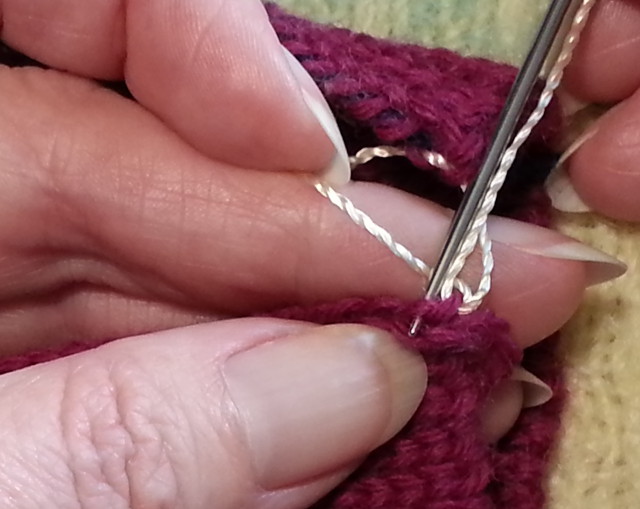
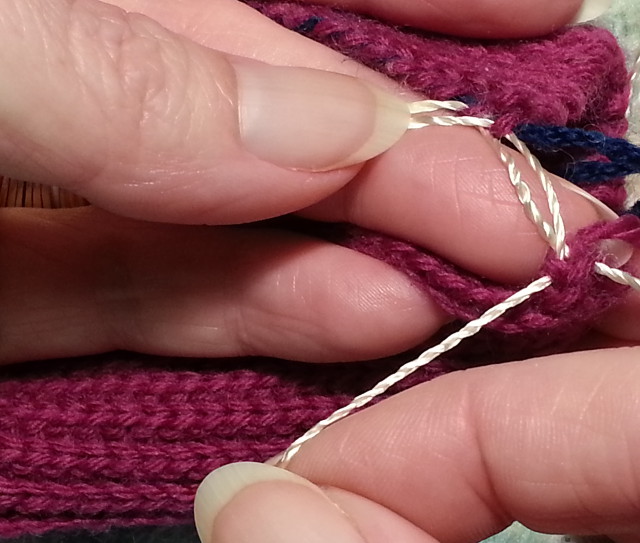
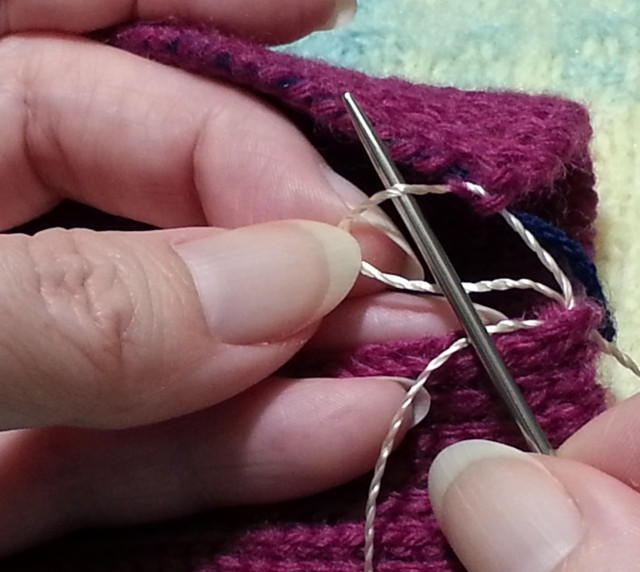
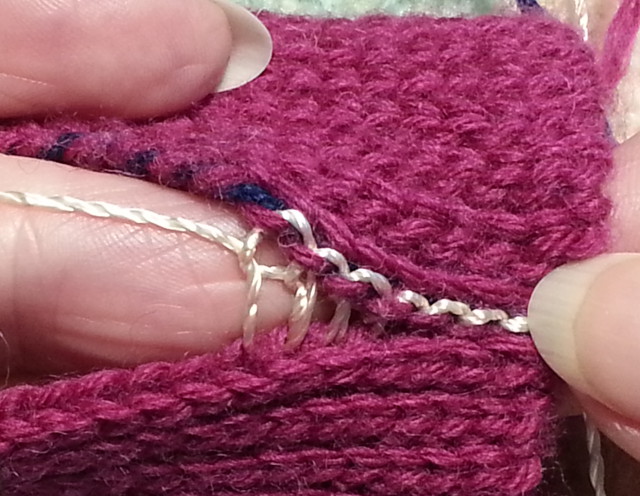
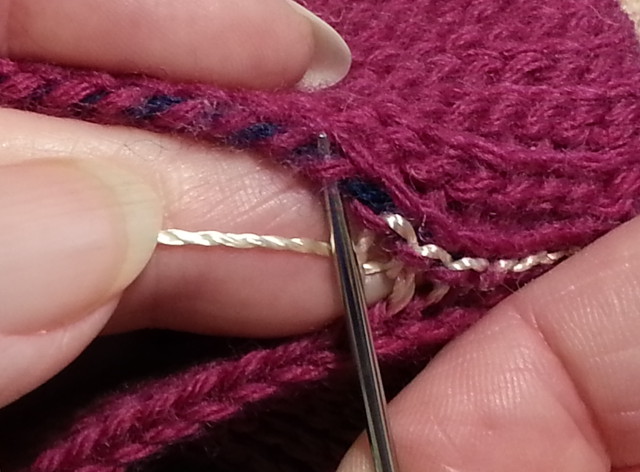
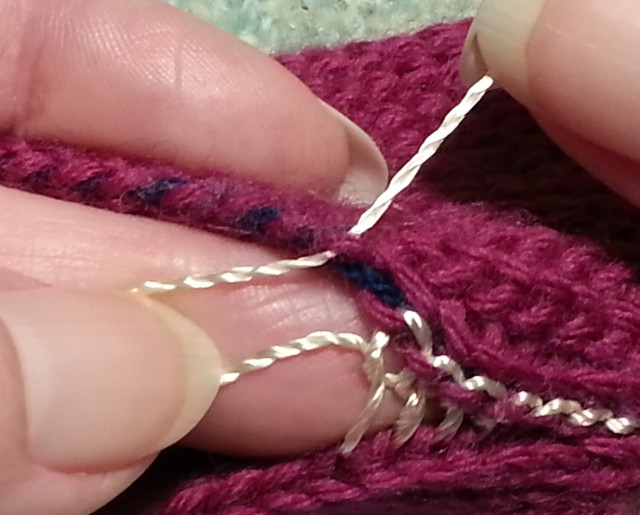
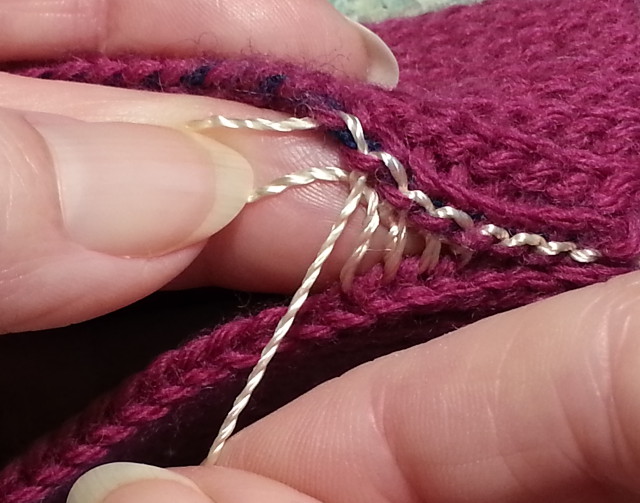
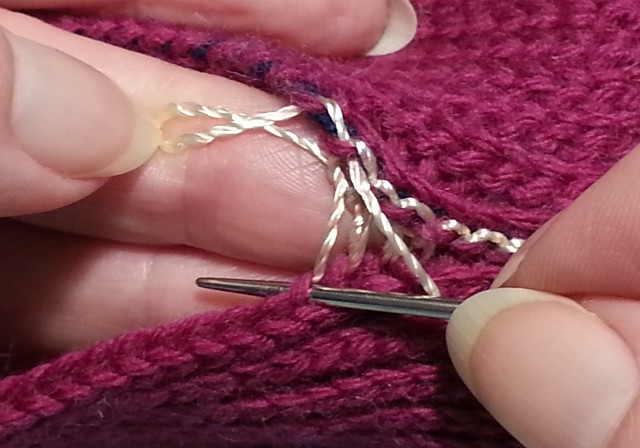
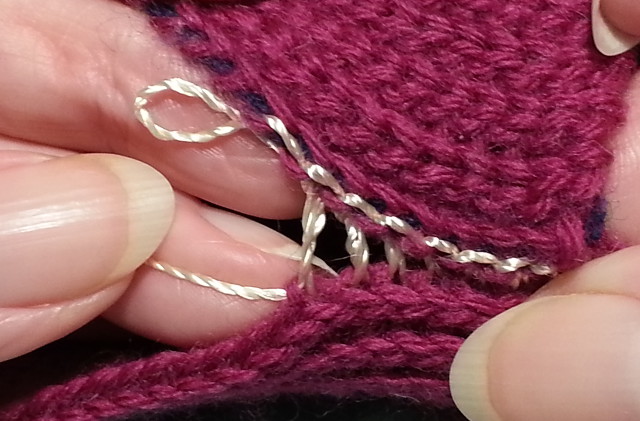
Later I used the same kind of ribbing for the bottom of my Puffy Rib tea cosy - again because it is so elastic. In the past I've always used a crochet slip-stitch to do the seam and while it was passable I wasn't fully satisfied because it didn't mimic the ribbing itself very well. On a short piece my eye isn't drawn to it very much, but on a long piece it really bothers me. Now I've worked out how to do that seam based on the same principles as grafting (Kitchener-stitching) in knitting. In this case I've used it to duplicate a slip stitch done through the back loop. The same principle can be used to duplicate other stitches if you are very careful to study the path of the yarn through the stitches and how they connect to the rows above and below them. To work that out I recommend working a few rows of your stitch pattern in one colour, then changing to another colour to work another row (in the direction your "graft" row will be) and then continuing with your pattern in another colour. The colour changes will let you see exactly how the working thread in your grafted row is connected to its neighbouring rows above and below. In the following sequence of pictures I have used a contrast, slippery yarn so that you can clearly see where the working thread is going. The first few pictures show you how to start. When you do this for your real seam you would use the tail that you see coming out of the last stitch on the bottom. For these pictures I have put it aside and used a contrast thread exactly as if it was the true tail. Tip: To work out how long you need your tail to be then, before you cut your thread and pull the tail through, work as many chain as you have slip stitches in your ribbing and add 15cm or so. Then cut your tail, undo these extra chain and pull the tail through. Please go through the whole stitch sequence below before you try it and pay particular attention to where the needle enters and exits stitches, the orientation of the loop being held by the left thumb, and how the working thread is put through the loops that have been created with the working thread. It will take a little practice to perfect your tension and, as with most things, the more you practice the better you get. I hope you find this tutorial useful, or at least interesting! Cheers... Megan
To work a small sample of the crochet ribbing chain 25. Run a guide thread through the back ridge loops of every stitch (see the tutorial below). Next row: Slip stitch into the back loop (not the back ridge) of the 2nd chain from the hook and every chain to the end, chain 1, turn. All other rows: Slip stitch into the back loop of every stitch (excluding the turning chain), chain 1, turn. Be careful that you get the very last stitch on each row, it likes to hide. Check your stitch count periodically and don't let your slip stitches get successively tighter and tighter. Stop when you have a a 15 cm length of ribbing and before you do the chain. Your last row should finish at the opposite end to the starting tail. Leave a tail (the tutorial explains how much to leave) and pull it through, ready to do the seam according to the tutorial. When you have finished the seam your starting and finishing tails will be at the same edge.
© Megan Mills, 25th June 2017 |
 in the window below and with a little luck you'll see a video showing just how springy it is.