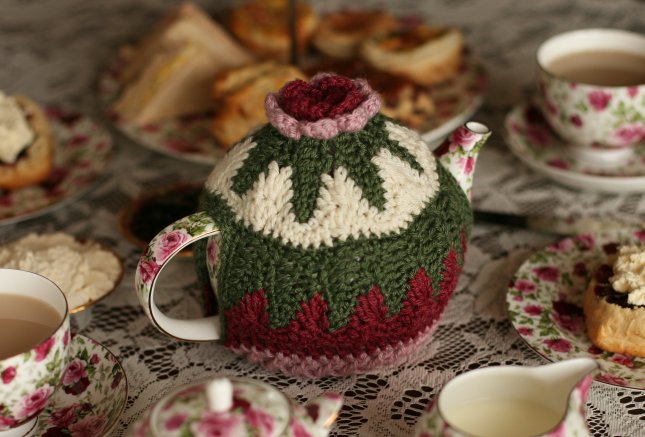
Rosy Cosy
A Free Crochet Pattern
by Megan Mills
megan@kiwi.gen.nz
 This teapot has a capacity of 750ml
|
Hello fellow crafty people. :)
I've been busy making a tea cosy based on the A Blanket of Roses Afghan design. I was part way through making a motif for the afghan at a cafe and I popped it on top of my teapot while I gathered my thoughts. Someone said to me 'Oh, are you making a tea cosy?' When I looked I thought, you know, it would make a pretty one. So I fiddled and twiddled and whaddyaknow? Here she is.
There are some unique crochet manoeuvres which I will describe in detail when I get to them in the pattern. You don't have to do these things the way I have but I found I got a tidier finish this way.
The Pie Crust edging I've designed to finish the cosy off would be just as handsome around the edge of an afghan or hat (and I'm sure you can think of other uses too). It can be worked over any even number of stitches if working circularly or an odd number of stitches if working back and forth.
| Abbreviations - given in US terminology as this is how the original afghan pattern was written. For those who use British terminology I have put the equivalent alongside in brackets. |
| ch | chain |
| sc | single crochet (dc double crochet) |
| hdc | half double crochet (htr half treble) |
| dc | double crochet (tr treble) |
| tr | treble crochet (dtr double treble) |
| sl | slip |
| sl st | slip stitch |
| st(s) | stitch(es) |
| beg | beginning |
| tog | together |
| yo | yarn over |
| dec | decrease - done by working the individual sts up to the last two loops only and then drawing through all loops on the hook to finish. |
| * | this symbol indicates that the directions immediately following are to be repeated a given number of times. |
| fptr | front post treble (fpdtr front post double treble) |
| Materials |
| 8-ply | 1 x 50 gr in each of burgundy (A), pink (B), green (C) and white (D) or any colour-way of your choice in a suitable Double Knitting yarn. I used Merino et Soie, a beautiful machine washable made in New Zealand that is 70% merino wool and 30% silk. It is heaven to work with and very, very strong. I used shades 207, 200, 215 and 203. |
| 1 | 5mm (H or 8) hook |
| 1 | Tapestry needle. |
| 1 | Hat elastic (length will vary on how small you need to tie it off for your pot). |
Note
The abbreviations used in the following directions are preceded by the explanation the first time they appear. It helps if you work over the tails you leave as you go, it is tidy and saves time on finishing at the end.
Size
This cosy fits a pot approximately 40cm in circumference and 13cm tall. It has a little stretch so will fit other pots about this size. If your pot is taller you can work more rows at the bottom (delaying the joins if you need bigger handle or spout holes). You could also vary the size by using thicker or thinner yarns.
Other Uses
This pattern would also make a rather cute child's hat if you don't 'skip leaves' where I've made holes for the handle and spout and, instead, work in continuous rounds.
Pattern
Round 1: Using Colour A: ch 4, join with a sl st to form a ring. Ch 3, 3 dc in ring, remove hook from loop, insert hook in 3rd st of ch 3 and draw loop through, ch 3, * 4 dc in ring, remove hook from loop, insert hook in first dc and draw loop through, ch 1 (bobble made), ch 2. Repeat from * twice more, join - 4 bobbles and 4 ch 3 spaces.
Round 2: * In next ch 3 space work 1 sc, 1hdc, 3 dc, 1 hdc, 1 sc (petal). Repeat from * 3 times more, join. Fasten off.
Round 3: With right side facing you, join Colour B in back at top of bobble. Holding petals forward, * ch 3, 1 dc between bobbles on Round 1, ch 3, sl st at back at top of next bobble. Repeat from *, ending ch 3, sl st in first sc where you started round to join - 8 ch 3 spaces.
Round 4: In ch 3 loops work petals all around, join - 8 Colour B petals. Fasten off.
Round 5: With right side facing you, holding petals forward, join Colour C in any junction between Colour B petals, * ch 7 loosely and then, working in the back ridge, 1 sc in 2nd st from hook, 1 hdc in each of next 2 sts, 1 dc in each of next 3 sts, holding petals forward 1 sl st at next junction between petals. Repeat from * all around, join - 8 leaves.
Round 6: Ss in next st, * 5 sc on side of next leaf, 3 sc in point of leaf (it can help a lot to use a smaller sized hook for that part), 5 sc on other side of same leaf, skip 2 sts. Repeat from * 7 times more, join. Fasten off.
Round 7: With right side facing you, join Colour D in center sc at point of any leaf and do 2 sc in same st, * 1 hdc in each of next 2 sts, 1 dc dec over next 2 sts, work a tr dec over the next 4 sts like this: (work a tr in next st but don't pull through last 2 loops, skip next 2 sts, work a tr in next st but at the end pull through all loops on hook finishing off both trs at once), 1 dc dec over next 2 sts, 1 hdc in each of next 2 sts, 3 sc in st at point of leaf. Repeat from * around, ending last repeat 1 sc in point of leaf, join.
Round 8: 1 sc in each of next 2 sc, *1 hdc in each of next 2 sts, 1 dc dec over next 3 sts, 1 hdc in each of next 2 sts, 1 sc in each of next 3 sc. Repeat from * around ending with 1sc in next sc. Fasten off.
Round 9: Using Colour C join in on dc dec between leaves Work 1 sc in every stitch all around, join.
Round 10: 1sc in the same st, ch 6 loosely and, working into the back ridge, into 2nd ch from hook work 1sc, then work 2 hdc, 2 dc and 1 dc into the side of the first sc made - this dc is attached to the round below it in a special way:
Yarn over hook and draw up a thread in the side of the sc, *poke hook through next st on previous round and draw a thread through it and two loops on the hook, repeat from *. Can you see how you've attached the dc firmly to the previous round? You'll attach all the final dc's of each leaf on this round that way. The leaf you have just done used up 4 sts of the previous round.
Sc dec over the next 2 sts, ch 6 loosely and continue on to make 6 more leaves. Sc dec over the next 2 sts, 2 sc, sc dec over the next 2 sts and make 7 more leaves to match first half. Sc dec over the next 2 sts, 3 sc, ss to beginning of round to join.
Round 11: 1 sc into each st to tip of leaf *(1 sc into side of last sc made) x 3, 1 sc into each of next 3 sts on other side of leaf, sc dec over next 6 sts like this: (without drawing through last 2 loops for each sc - 2 sc, skip 2 sts, 2sc, draw through all loops on hook), 3 sc. Repeat from * to top of 7th leaf. (1 sc into side of last sc made) x 3, sc down other side of 7th leaf (don't do any decreases). Ss over the sts separating the sets of leaves. Complete 2nd half of leaves on this round to match the first half and ss over the sts separating the sets of leaves. Don't fasten off - leave in waiting so you can use at the end to work around the hole (or you can fasten off if you leave a long enough tail to use later or don't mind joining in a new yarn later).
Round 12: Actually - 'Rounds' 12 to 14 inclusive are worked back and forth on each half. I'll give directions for ONE half and you repeat them on the other half to match. This will make the holes for handle and spout. At Round 15 we join up into proper rounds again.
Using Colour A: Joining in centre st at leaf tip do 2 sc, * sc and hdc dec over next 2 sts (the first st is a sc and the second st is a hdc), 4 dc dec over next 5 sts (by skipping the middle st), hdc and sc dec over next 2 sts, 3 sc in next st. Repeat from * to top of last leaf but end with 2 sc rather than 3 sc. Turn.
Round 13: 1 sc into same st, *1 hdc in next st, dc dec over next 3 sts, 1 hdc in next st, 1 sc in next st. Repeat from *. Turn.
Round 14: In same sp do 1 sc and then work 1 sc into side of last sc twice more. This is the equivalent of chaining 3 to stand in for the first dc but is 'thicker'. 1 dc into each st to the end, ch 3 and leave a long tail (at least 6 inches).
Do 12, 13 and 14 to other side to match. At the end of Round 14 join the ch 3's to the top of the first st on the other side of the handle or spout hole. Fasten off.
Now we do the Pie Crust Edging.
Round 15: Using Colour B do 1 dc in every st all around including the 3 ch 'bridges' over the handle and spout holes. Join. Make sure you have an even number of dc's in the Round. If you do not then 'fudge' in an extra somewhere (under the handle or spout hole is a good spot).
Round 16: In same sp do 1 sc and then work 1 sc into side of last sc twice more. *In next st work a dc but do not draw through last 2 loops, work a fptr around the 4th dc on the row below from the st where you are (counting the st where you are as Number One), finish off the fptr and dc tog. 1 dc in next st. Repeat from * all around ending with the fptr combination. Join.
Round 17: Work crab stitch all the way around. Crab Stitch, by the way, is working single crochet 'backwards' by working around from left to right. It is also called Corded Crochet.
*Holding your hook pointing the way it normally does insert it from front to back through the last st (not the next st as is usual), draw through a loop which you pull up so that it is still to the left of the other loop on your hook. You need to do a sort of 'scooping under-and-up' motion. Yarn over hook and draw through both loops on hook. Repeat from *. It is important not to let your tension be too tight for this and practicing on a scrap of crochet will perfect your technique very quickly. Fasten Off.
Note: If you need more under the spout or handle then you can do another repetition of pie crust edging by doing Rounds 15, 16, 16, 17 instead of just 15, 16 and 17. You can play around and get different effects by working 4 dc's behind you (instead of ahead of you) for the fptr combinations and you'll get a sideways V effect. Or you could work in between the first set of fptr combinations for a completely different effect. This is a lot of fun (and somewhat addictive)!
Finishing - Please read all the way through before commencing the finishing work.
Using Colour C work ss all around the handle and spout holes. You can work these a little loosely or a little firmly. Experiment if needed to find what works best to custom fit the holes to your teapot. Fasten off.
Now thread hat elastic through the last round on the inside of the cosy and tie off tightly to a size that will go easily over your teapot but then 'pull in' at the bottom to hold it cosily around the pot. If you don't like it to pull in run some elastic through and tie it off to the finished size of the crochet. This will provide extra support to your cosy so that the bottom edge doesn't stretch out of shape from repeated use. If you like you can apply the same principle to the handle and spout holes. If so you might like to work around them in Crab Stitch instead of ss.
Tidy away all your ends and make a cuppa tea!... Megan
|