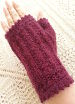
Free Patterns
Chirality Spirality Muffatees
Hand Warmers
Shawl Mitre Corner Pattern
Mitred Corner
Crocheted Ribbing Seam Tutorial
Crocheted Ribbing
Seam Tutorial
Nappy / Diaper / Baby Cake
Nappy Cake
Tiramisu Recipe
Tiramisu Recipe
Bowl/Jug Cover Bourbon Rose
Bowl Cover
How to Block
Blocking Howto
Step by Step Bourbon Rose
Rose Howto
Bowl/Jug Cover Square
Bowl Cover
Irish Lace Collar
Collar
Crochet Curved Edging
Filet Mat
Filet Mat
Filet Mat
Filet Mat
Estonian Lace
Estonian Lace
Counterpane
Counterpane
Quick Knitted Poppy
Quick Knit Poppy
Meggy Square
Meggy Square
Slippers
Slippers
Slippers
Flat Slippers
Beret
Crochet Beret
Hat
Prime Rib Hat
Hat
Bicolour Hat
Bicolour Tea Cosy
Bicolour Cosy
Tea Cosy
Tea Cosy
Tissue box cover
Tissue box cover
Baby Jacket
Baby Jacket
Seamless Bootee Pattern
Seamless Bootee
Mitres Tutorial
Mitres Tutorial
Crochet Butterfly
Crochet Butterfly
Crochet Pelerine
Crochet Pelerine
Swan Symphony Doilies
Swan Doilies
Crochet Brioche Hat
Crochet Brioche
Hat
Crochet Brioche Tea Cosy
Crochet Brioche
Tea Cosy
Puffy Rib Cosy
Puffy Rib Cosy
Crochet Coffee Plunger Cosy
Crochet Roses Tea Cosy
Rosy Cosy
A Blanket of Roses Afghan
Roses Afghan
Hexagonal Motif
Hexagonal Motif
Crochet Strip Method Rose
Crochet Rose
Step by Step Double (Single) Crochet Instruction
dc HowTo
Odd Tutorials and Instructions
Tutorials
Crochet:
Tidy Ends
Change Colours
Back Ridge
Starting Chain
Mystery Stitch

Knitting:
Buttonholes
Twice Knit
Increase/Decrease
Crochet Square Tutorial
Crochet
Square Tutorial
Tatting Bobbin Lengths
Tatting Bobbin
Lengths Chart
Wagon Wheel Motif
Crochet Square
Megan's Granny Rectangle
Granny Rectangle
Crochet Bib
Crochet Bib
Crochet Bootee
Crochet Bootee
Soccasins &
Mary Janes
Crochet Bootee
Crochet Bootee
Crochet Bootee
Crochet Bootee

Megan's Reinforced Buttonhole

A Free Knitting Pattern
by Megan Mills
megan@kiwi.gen.nz


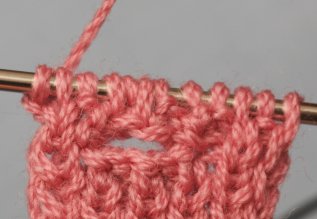
The finished buttonhole as viewed from the right side.


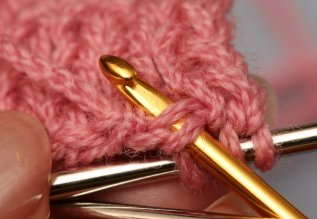
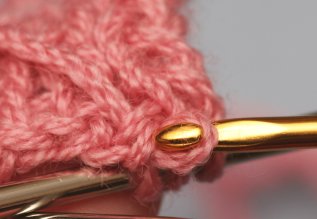
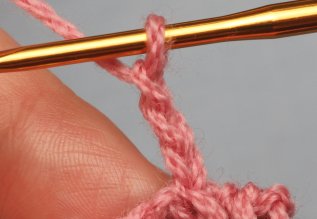
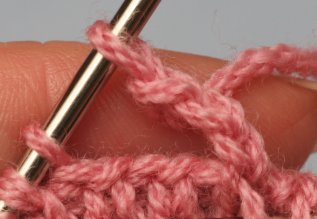
Hello fellow crafty people :)

I'm one of those pernickety knitters who likes buttonholes to be tidy, symmetrical and well-behaved. All the buttonholes I tried had little things that annoyed me, the major one being that the 'cast on' edge when stitches were replaced didn't match the edge created when the stitches were cast off.

They also had a tendency to stretch out of shape when used and, inevitably, they ended up failing to live up to their job - buttons would slip out of them all the time. Ugh.

I sat down one day and spent several hours fiddling and twiddling with all sorts of variations. In the end I settled on this hybrid that reinforces the corner in a similar way to a one-row buttonhole I had found described by Elizabeth Zimmermann but uses a crocheted provisional cast on.

If you know how to knit chains by doing a yarn over and passing the stitch on the right needle over it you can get by without using a crochet hook at all.

The result is the strongest, tidiest (from both sides!) best-behaved buttonhole I was able to devise. The instructions may look long and a little intimidating but once practiced a couple of times the buttonhole itself is very fast to do. If you've been frustrated by buttonholes like I have, give this one a try instead.

I hope you enjoy making them...  Megan

Instructions with Pictures


Figure 1: Bring yarn to near side.

Figure 2: Slip 1 purlwise

Figure 3: Take yarn to far side.

Figure 4: Slip 1 purlwise.

Figure 5:

Figure 6: Pass the first slipped stitch over the second.

Figure 7: The stitch is halfway through being pulled over.

Figure 8: The stitch is completely pulled over.

Figure 9: Slip another stitch purlwise; pass prior slipped stitch over it. Continue in this manner 'casting off' the required number of stitches.

Figure 10: Put the last stitch back on to the left needle, reversing the mount.

Figure 11: Flip your work towards you so that you are looking at the back of it.  I am using the crochet hook here just to point out the two horizontal bars lying directly under (or above from this angle) the last stitch on the right hand needle.

Figure 12: Use a crochet hook the same size as your knitting needles to hook a loop through the two horizontal bars.

Figure 13: This loop counts as your first chain.

Figure 14: Continue on to make one less chain* than the number of stitches you have 'cast off'. As I cast off 4 stitches I made 3 chain.

*Note: The chains must be just a little looser than you would normally make with the yarn because they will be tightened by the next row. You might need to experiment a little to find just the right size to make the chains for your yarn and tension.


Figure 15: Put the last loop from the hook on to the left hand needle.

Figure 16: Now pull the first stitch on the left needle through your last chain and put it back onto the left needle.

Figure 17: Pulling the stitch through

Figure 18: The pulled-through stitch ready to be returned to the left needle.

Figure 19: If your first stitch on the left needle is a Purl replace it so the yarn is on the near side between the first and second stitches. This puts it in the correct position for purling that stitch.

Figure 20: Work to the end in the pattern established (so if, for example, you are doing rib, purl the purls and knit the knits).

Figure 21:  Note here that I am actually working the first stitch on the left needle.  At the end turn and work back until you come to the buttonhole again.

Figure 22: Here I am using the crochet hook to point to the back ridge of the chain which I revealed by rotating the chain backwards slightly.

The back ridge is the little 'bump' on the back of the chains, as contrasted with the smooth 'V' on the front of the chains.


Figure 23: When you come to the chains again pick up replacement stitches purlwise or knitwise (as required to keep your established pattern) in the back ridge of each chain.

My next stitch needs to be a purl so my needle here is inserted purlwise.


Figure 24: This is the first purl stitch completed in a back ridge.

Figure 25: Here I have taken my working yarn to the far side and inserted my needle knitwise through the next back ridge.

Figure 26: The knit stitch is completed.

Figure 27: Continue to pick up a stitch in each back ridge - one for each stitch you cast off.  Make sure you've got them all, count them now.  Continue with your knitting as usual.

Figure 28: Here I have continued in ribbing to the end of that row.  The finished buttonhole is as viewed from the wrong side.
Once you have worked through the instructions with pictures you should find the following, much more succinct directions, quite sufficient.

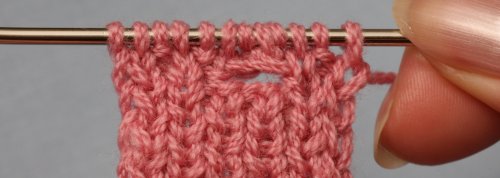
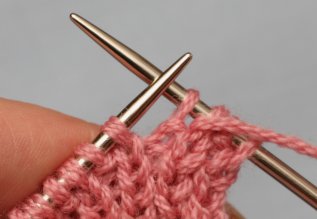
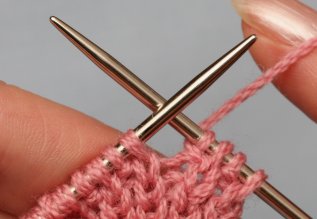
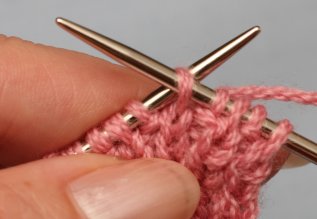
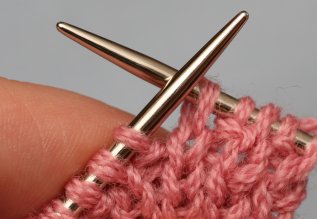
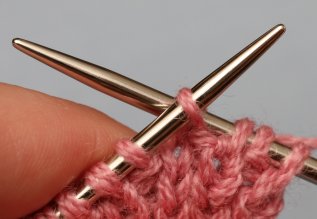
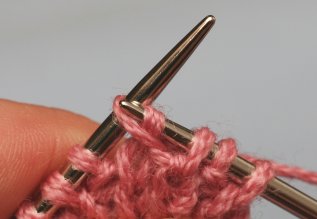
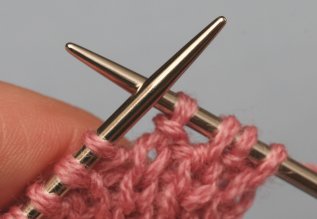
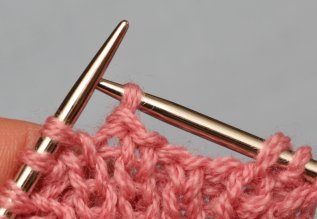
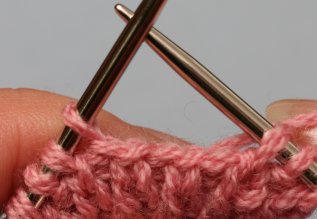
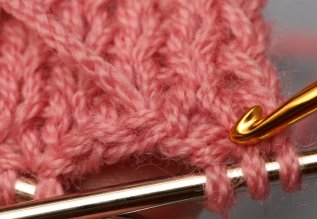
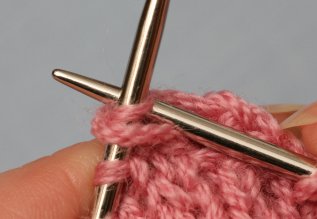
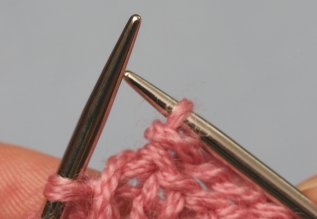
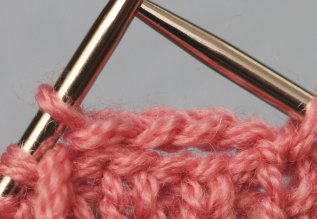
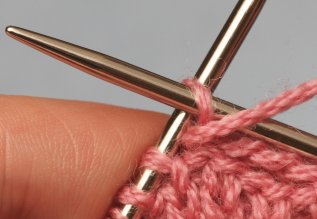
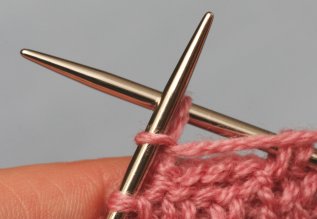
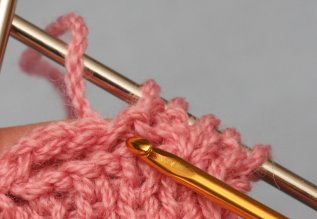
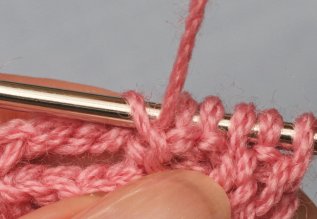
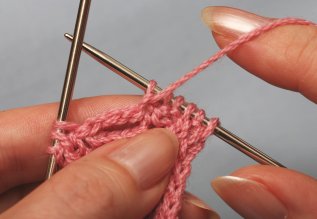
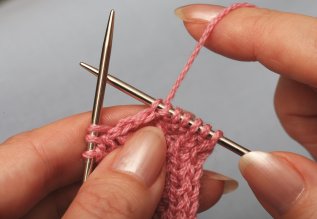
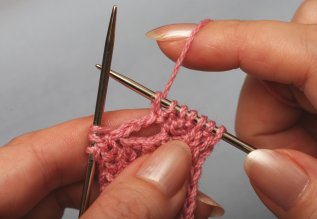
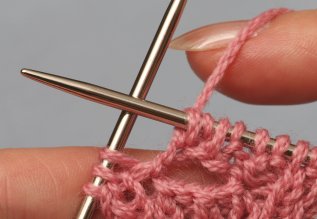
Megan's Reinforced Buttonhole - Words Only

If working in rib work up to a purl stitch and 'cast off' to a purl stitch to get the tidiest result in the following instructions.  I worked this example on a ribbing band 12 stitches wide and I cast off a total of 4 stitches.

Bring yarn to near side, Slip 1 purlwise, take yarn to far side, Slip 1 purlwise. Pass the first slipped stitch over the second. Slip another stitch purlwise; pass prior slipped stitch over it. Continue in this manner 'casting off' the required number of stitches.

Put the last stitch back on to the left needle, reversing the mount.

Hooking the first loop through the two bars of yarn directly under the centre of the last stitch on the right needle use a crochet hook the same size as your knitting needles to make one less chain* than the number of stitches you have 'cast off'. As I cast off 4 stitches I made 3 chain.

Now pull the first stitch on the left needle through your last chain and put it back onto the left needle. If your first stitch on the left needle is a Purl replace it so the yarn is on the near side between the first and second stitches.

*Note: The chains must be just a little looser than you would normally make with the yarn because they will be tightened by the next row. You might need to experiment a little to find just the right size to make the chains for your yarn and tension.

Work to the end in the pattern established (so if, for example, you are doing rib, purl the purls and knit the knits).  Note that I actually worked the first stitch on the left needle.

When you come to the chains again pick up replacement stitches purlwise or knitwise (as required to keep your established pattern) in the back ridge of each chain. The back ridge is the little 'bump' on the back of the chains, as contrasted with the smooth 'V' on the front of the chains. Make sure you've got them all, count them now. Continue with your knitting as usual.

Four handy hints regarding buttonholes

  • Position buttonholes so that their ends are where you want the buttons to sit. If you position the middle of them where you want the buttons to sit the buttons will slide to the end of the buttonholes anyway once any stress is applied and the buttons ends up off-centre.
  • Use horizontal buttonholes when the stress is pulling sideways and vertical buttonholes when the stress is pulling downwards. When stress is applied it 'pulls' the buttonhole more closed around the button. If you do it the other way the stress helps to pull the buttonhole open - exactly what you do not want. This is why buttonhole bands on cardigans that have vertical buttonholes so often have trouble with the buttons popping undone.
  • When it comes to remembering which side to put the buttonholes on for Men's or Women's garments - Women are always right!
  • If you're making a garment for a baby that is on its way and you don't know whether it is a boy or girl you can put buttonholes on both sides and 'close' the buttonholes that are not required when you sew the buttons over them.

Home Page and more Patterns
© Megan Mills, 19 April 2006