The other one is made with the Touch yarn.
|
The other one is made with the Touch yarn. |
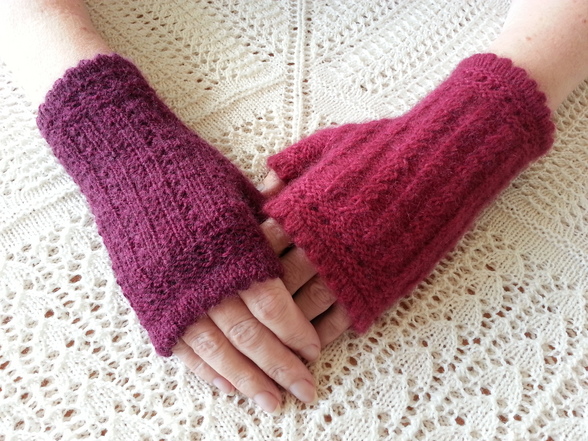
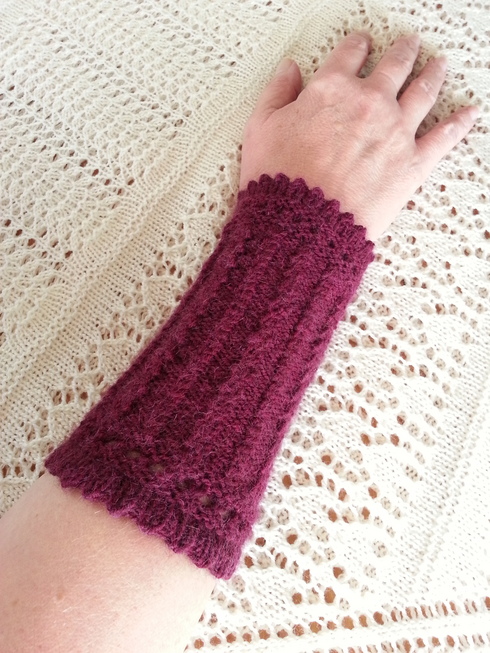
In this version the wider cables spiral towards the thumb. If you'd rather they spiralled towards the outside of your hand then just swap the RTs and LTs for the hourglass cables in the chart. The skinny cables all use a right twist but you can mirror these too by making them on the second half of the chart with left twists instead.
I distribute the stitches over four double pointed needles (10 on each at the beginning, 12 later) and work with a fifth. However you do yours it is quite handy to draw coloured lines up the chart to indicate the divisions of your needles.
For your comfort these muffatees have a thumb gore and a thumb gusset. With the ending hems grafted rather than sewn they will match the hems at the beginning. While the muffatee is “plain” on the inside rather than “patterned” this hem treatment means they can successfully be worn inside-out.
Materials: The yarn I used by Touch Yarns has 60% merino, 30% possum and 10% silk. A 100 gram hank is about 420 metres and it recommends a 3.75mm needle. I used 30 grams – you may need more or less depending on how long you do the arm, how far up your fingers you want to go and how light or heavy your yarn is for its grist. This yarn is considered a "6-ply" but can knit as an 8-ply or double knitting because of the "loft" provided by the possum and that also, of course, gives more meterage for its weight.
A set of 15cm double pointed (dpn) or circular 2.5mm needles (or size to obtain gauge)
A thinner set of needles
A locking marker
An arm's length of a much thinner, smooth contrasting yarn to use as lifelines
A blunt wool needle
Gauge: over the 8 stitches of the twist stitch/hourglass cable pattern repeat when relaxed but flat is 2cm from the left-hand edge of one "skinny twist" column to the left-hand edge of the next "skinny twist" column. Each 4 rows of pattern (measured mostly easily by measuring the hourglass cable) is pretty close to 1cm tall so that by the time I've done all the twist stitch/hourglass cable pattern repeats as charted that portion of the pattern 13.3cm tall. I have to work quite firmly on 2.5mm needles.
Size: Fits my hand which is 15.5cm around the wrist (over the wrist bone) and 18.5cm around the widest part of the knuckles on my hand. Around my hand at the widest part, with my thumb held “closed”, rather than my hand “spread out”, is 22cm. From my wrist (in line with my wrist bone) to the first knuckle on my middle finger is 15cm. This is a stretchy pattern though so will fit hands a little bigger and a little smaller. You can also vary the size greatly by changing your yarn and/or gauge.
When I tested the pattern using Naturally Waikiwi (a 4-ply sock yarn with 55% Merino, 20% nylon, 15% alpaca and 10% possum) and the same needles one muffatee weighed 21 grams, but turned out just a bit narrower and shorter than the one in Touch Possum Merino - but it still fits me nicely as you can see in the above picture.
Experience level: This is a pattern for experienced knitters.
| Abbreviations: Further abbreviations used on the charts are explained on the charts. | |
| JMCO | Judy's magic cast on (JMCO and her JMCO bridge can be found in Judy Becker's book “Beyond Toes”). |
| K | knit |
| K2T | knit two together (a right-leaning single decrease) |
| LT | left twist = Cable front, first st in front of second st. |
| M1K | pick up the thread running to the next st on the left needle from back to front and knit it. |
| M1P | pick up the thread running to the next st on the left needle from back to front and purl it. |
| O | yarn over |
| Patt | pattern |
| P | purl |
| SSK | slip, slip, knit (a left-leaning single decrease) |
| st(s) | stitch(es) |
| Rnd(s) | round(s) |
| RT | right twist = Cable back, first st behind second st. |
Tips for grafting (or sewing) picot hems
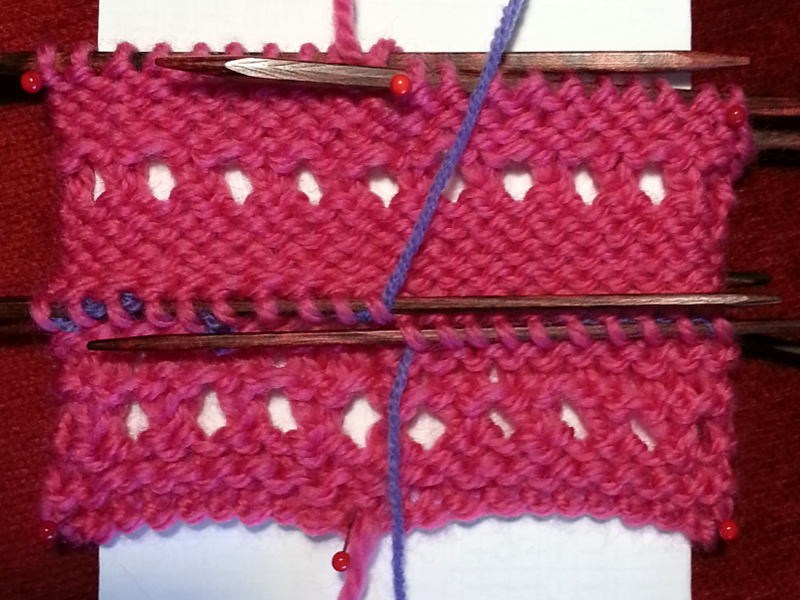
Immediately after working the round marked with a ◄ put in a safety line. Put it in the back (the inside of the muffatee) picking up every bump that is a “down bump” between the sts on the needle. These are the running threads between each st.
The first bump to pick up is the bump between Sts 1 and 2 of the round and the last bump to pick up is the one between Sts 40 of the previous round and 1 of the same round. Take the safety line up through each bump in the same direction, from bottom to top if working in the same direction as the knitting. On the thumb the first bump to pick up will be between Sts 1 and 2 of the round and the last last bump to pick up is the one between Sts 16 of the previous round and 1 of the same round. (I do this using a blunt wool needle and I'm very careful not to pierce any wool. These are the bumps you'll be using later for either grafting or sewing the picot hem in place. Of course, this method will work for other hems worked circularly as well!)
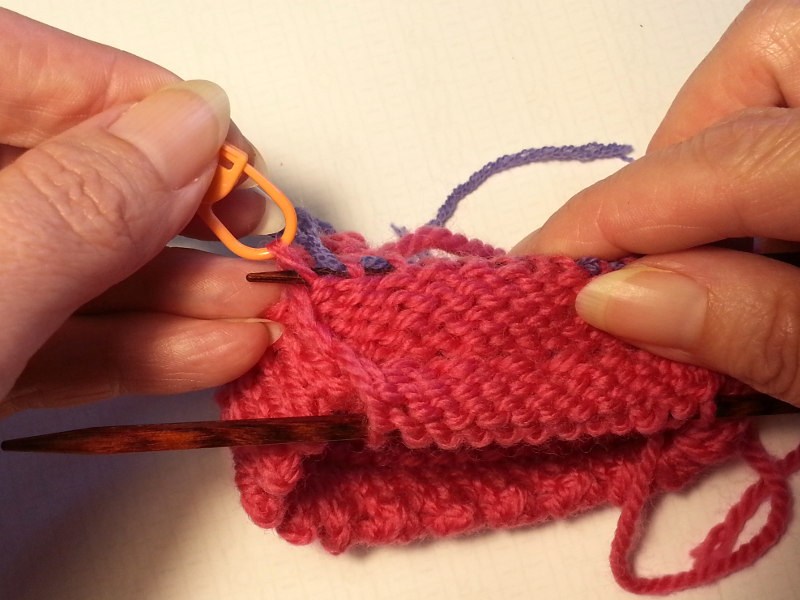
After working the final knit round cut a tail 6 times longer than the circumference of the knitting. Using a thinner set of needles (dpns if you worked on dpns, circulars if you worked on circulars) pick up all the bumps that you've put on the safety line. Pick them up in the same order and in the same direction as the safety line. This mounts them properly for grafting.
Hint: Click any image below to bring up much larger image in a new window for closer inspection.
|
DO NOT REMOVE the safety line until you are completely happy with the finished graft. If you get it wrong you can easily go back and correct it if this safety line is still in. You should have the same number of bumps picked up on each needle as you have on your main needles. For example, I used dpns with 10 sts on each of 4 needles for the main knitting and I have just the same on my “safety line set”. |
|
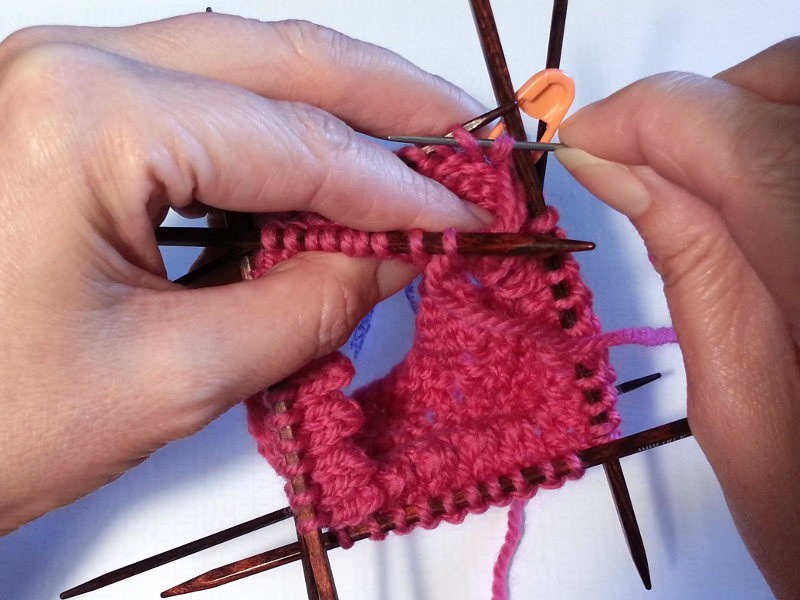
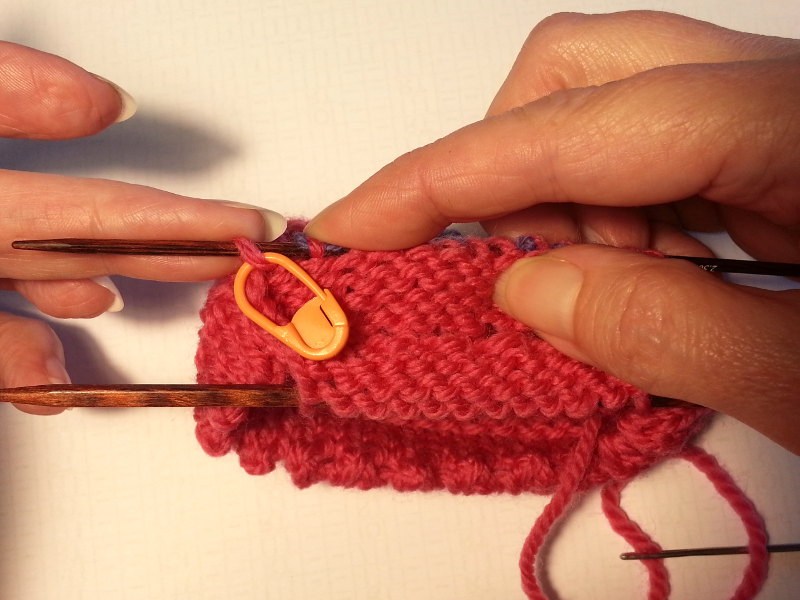
Fold the work so that the thinner set is lined up behind the main set. The set in front we'll call the “front needle” and the thinner set behind we'll call the “back needle”. When we graft we will knit and purl “on” and “off”. This means to insert the blunt wool needle into that stitch knit or purl-wise as the case may be and pull the tail through it. If you are instructed to do it “on” then the stitch is only half-grafted and stays on the needle. If you are instructed to do it “off” then the stitch is now fully grafted and you let that stitch drop off the needle.
|
Step 2 (shown above): Go to the back needle and knit off the first st, then also place it on a locking marker, then purl on the next st.
|
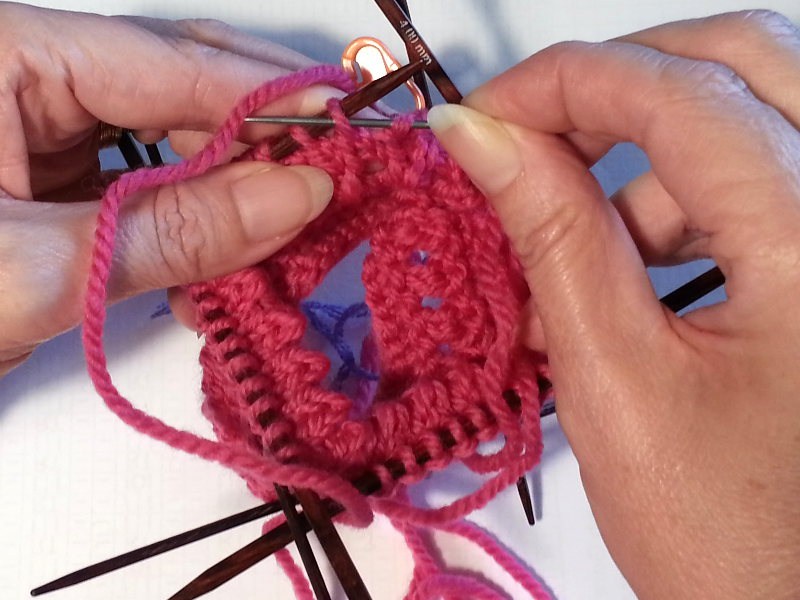
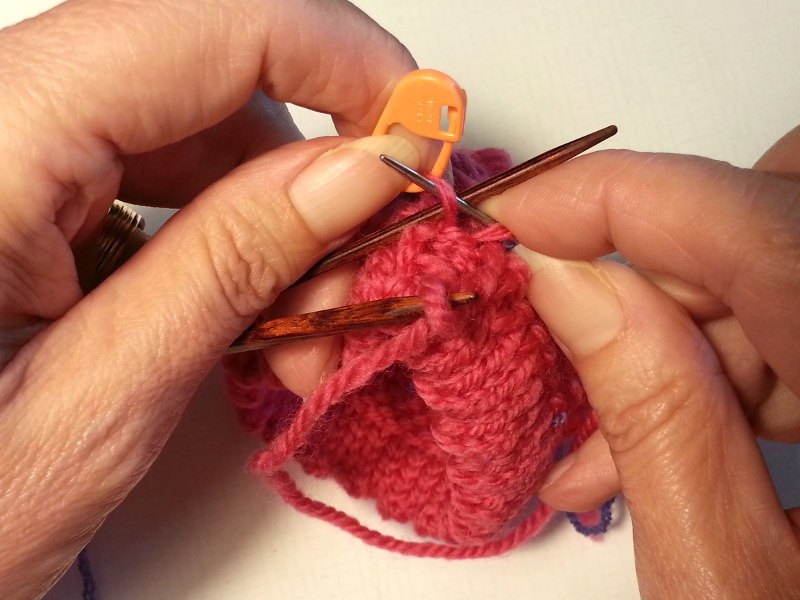
Step 3: Return to the front needle and knit off the first st, then purl on the next one. (See at left.) Step 4: Return to the back needle and knit off the first st, then purl on the next one. Repeat Steps 3 and 4. If you are using more than one needle as your back needle then when there are only a couple of sts left on each needle slip them onto the next one. This makes it easier to do a continuous graft. Keep your graft a little loose at this stage and always keep the grafting thread running under the knitting needles.
|
|
|
|
When you have the very last 2 sts of the round left on the back needle (counting the one that is on the locking marker) and have just purled on the last st on the front needle return to the back needle knit off the first st, then purl on the next one (which has the locking marker in it).
|
|
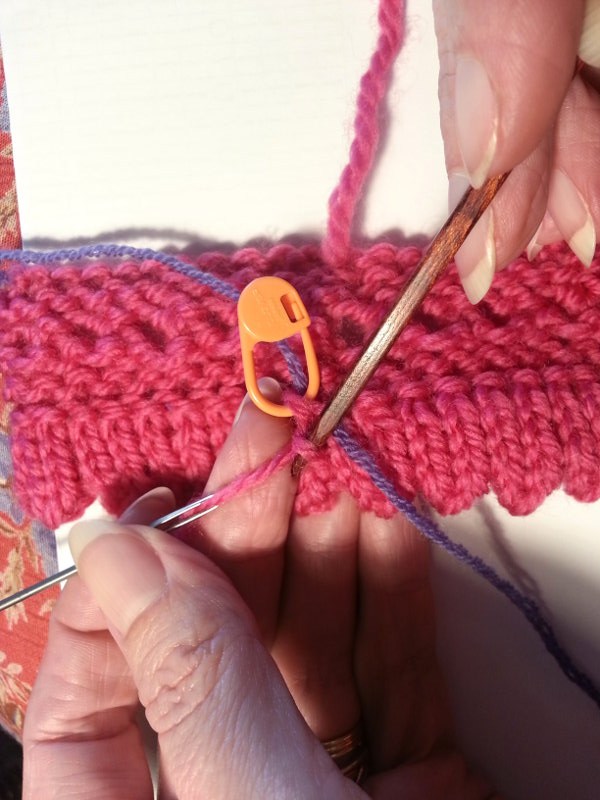
Return to the front needle and knit off the final st. The graft is complete. Now adjust your tension. I find it easier to do this in several passes right around, making the graft a bit firmer with each pass. It is much easier to tighten a too-loose graft than loosen a too-tight one. You'll also find that you are pulling through smaller loops than trying to do it one pass and, for me at least, it is easier and faster in the long run. The hem should sit reasonably flat and fold at the picot points. If you leave this graft too loose then this side of the hem is too long which doesn't give a nice turn to the hem. Remove the safety lines when you are certain you won't need to do any corrections to the graft.
|
Wrist
Cast on 40 stitches using JMCO – put 40 on a thread and keep the other 40 on your needle(s)Join into a circle being careful not to twist.
Rnds 1–5: Knit.
Rnd 6: Do a full round of (K2T, O).
Rnds 7-11: K.
Rnd 12: Transfer sts on the thread to the thinner set of needles. Fold at the (K2T, O) row so that the thinner set is behind your main set of needles. K together a st from the main needle and a st from the thinner needle and repeat that all around. (Hint - if you don't get a crisp turn, particularly with thicker yarns, try doing one more round of K first.)
Rnd 13: P.
Rnd 14: K.
Rnd 15: P.
Rnd 16:K.
Rnd 17: Do a full round of (K2T, O).
Rnd 18: K.
Rnd 19: P.
Rnd 20: K.
Rnd 21: P.
Rnd 22: K.
Rnd 23 (the Set-up rnd on the chart): Starting with a P1 do a round of K2, P2 rib at the same time evenly increasing 8 sts, end with a P1. (48 sts)
This is how I did mine: (P1, K2, P2, M1K, K1, P2, K2, M1P) x 4
Now work the chart until it is long enough from the wrist that you want to start increasing for the thumb gore. On the chart you can see that I did 16 rnds after the Set-up round.
If you want to make yours shorter or longer then stop after a Rnd 4 of the pattern repeat.
Thumb gore
For the next 17 rounds replace the blank rectangle in the main chart with the Thumb Gore chart.
Create thumb gusset bridge
To do the JMCO bridge in this rnd I use the tail attached at the other end of the ball and I leave it attached because I'll be using it later to knit the rest of the thumb. You may use a second ball if you prefer.
Next Rnd: Work in patt for 6 sts (not counting the YO as a st) and, with tail of second yarn to the left, do a JMCO “bridge” with 6 sts on each side of the bridge. You make the bridge by putting 6 of the JMCO sts onto the same needle you've been working the main rounds with and the other 6 JMCO sts onto a separate needle.
Put the 16 sts of the thumb onto a thread along with the thumb-gusset bridge sts.
Continue knitting in pattern to the end of the rnd.
Continue the hand
Next rnd: Patt 5 sts and across the gusset do SSK, K4, K2T, continue in patt to the end of the round.
Next rnd: Patt 5 sts and across the gusset do SSK, K2, K2T, continue in patt to the end of the round.
Next rnd: Patt 5 sts and across the gusset do SSK, K2T, (the last two sts on your right needle will form a “skinny cable” from now on). Continue in patt to the end of the round.
You are back to the number of sts you had before you increased for the thumb gore.
Continue to follow the chart until the muffatee is a finger-joint's length short of the final length you want. Finish after a Rnd 1 of the pattern repeat. I completed 12 whole hourglass cables.
Next rnd: Keeping in patt evenly decrease 8 sts.
This is how I did mine: P1, SSK, P2, K2, P2, K2T, P2, K2T, P2, K2, P2, K2T, P2, K2T, P2, K2, P2, SSK, P2, K2T, P2, K2, P2, K2T, P1.
This could also be written out as:
Needle 1: P1, SSK, P2, K2, P2, K2T, P1 Needle 3: P1, K2T, P2, K2, P2, SSK, P1
Needle 2: P1, K2T, P2, K2, P2, K2T, P1 Needle 4: P1, K2T, P2, K2, P2, K2T, P1.
Finishing the hand
K 1 rnd, P 1 rnd, K 1 rnd, P 1 rnd, K 1 rnd.
Next rnd: (K2T, O), repeat all around.
K 1 rnd, P 1 rnd, K 1 rnd, P 1 rnd.
◄ K1 rnd. (See special notes about tips for grafting/sewing picot hems)
K 4 rnds.
Next rnd: (K2T, O), repeat all around.
K 4 rnds.
Cut a tail 6 times longer than the circumference of the knitting, turn down the hem and either graft or neatly sew it down. It helps to turn the muffatee inside-out for this. Remember to keep the hem elastic.
Thumb
Pick up all the stitches on your thread holders around the thumb and across the gusset. You should have 22 sts altogether.
Rnd 1: Use the yarn still attached from your JMCO and knit the first st from the thumb and move it to the last needle. (You have moved the beginning of the round by one stitch and the previous first stitch of the round is now going to be the last st on the gusset.)
Work in patt across the thumb until you get to the gusset (which has 8 stitches on this round and includes the last stitch of the thumb, the 6 sts of the JMCO bridge and the stitch you moved when you started this rnd), SSK, K4, K2T. The gusset now has 6 sts.
Rnd 2: Work in patt to the 6 gussets sts, SSK, K2, K2T. The gusset now has 4 sts.
Rnd 3: Work in patt to the 4 gussets sts, SSK, K2T.
Rnd 4: Work in patt to the last 2 sts, RT.
K 1 rnd, P 1 rnd, K 1 rnd, P 1 rnd, K 1 rnd.
Next rnd: (K2T, O), repeat all around.
K 1 rnd, P 1 rnd, K 1 rnd, P 1 rnd.
◄ K1 rnd. (See special notes about tips for grafting/sewing picot hems)
K 4 rnds.
Next rnd: (K2T, O), repeat all around.
K 4 rnds.
Cut a tail 6 times longer than the circumference of the knitting, turn the hem and either graft or neatly sew it down. It helps to turn the muffatee inside-out for this. To do this with the thumb I put all the sts on a thread, turn it inside out, and then put the sts back on the main needles again. Remember to keep the hem elastic.
Overall finishing
To finish turn the muffatee inside-out and use tail from JMCO bridge to weave over any “gap” in the thumb and tidy the end away.
Tidy the ends away at all three picot hems by weaving it up and down through a few horizontal bumps on the inside. Then run the ends of the tails through the hems for a short distance.
Leave the tails long until you've washed and blocked the muffatees, then trim.
To convert the handwarmers to wristers that will also be mirror-imaged no matter what way you put them on (either hand, either end first) you'll need to do two things.
1) Omit the thumb gore and thumb and the work the tube straight up.
2) Work all the "wide" cables on one wrister twisting to the left:
and all the "wide" cables on the other wrister slanting to the right: